Store manual

Unmanned screen golf · 24 hours

No help needed.
Start to finish.

Guests from booking to checkout, operators from one console, installers by the checklist. Every screen shown with a step is a real capture of the app.

Like a single swing — from booking to entry, without a stop
77steps
54real screens
4languages
24hours unmanned

Screens were taken at the test venue (테스트매장). Names, amounts and codes are test data; phone numbers are masked by the app itself. Test-server addresses are shown as the live address (xgolf24.com).

CHAPTER 01

Guests

Book → pay → open the door → extend → tidy up and leave. All on your phone.

  1. 1.1Book in the app
  2. 1.2Enter — your digital room key
  3. 1.3Extend · tidy up · leave
  4. 1.4My bookings · cancel
  5. 1.5Walk in at the kiosk (no booking)
  6. 1.6Prize challenge · table tablet
Book in the app — 1
Book in the app — 2
Book in the app — 3
Book in the app — 4
Book in the app — 5

1.1

Book in the app

5 steps

Book in the app — 1
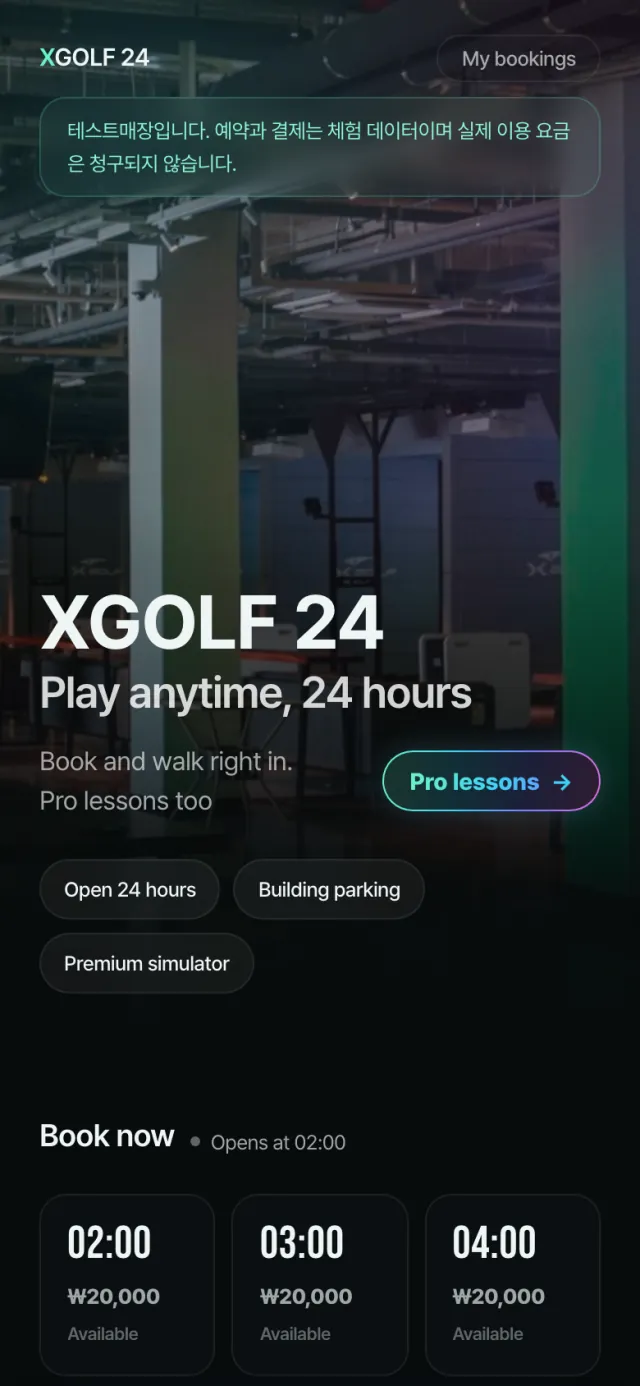
  1. Open the booking page from the venue's text message or poster QR. The earliest free time is under Book now. If there is more than one venue, a venue list comes first — pick one.

Book in the app — 2
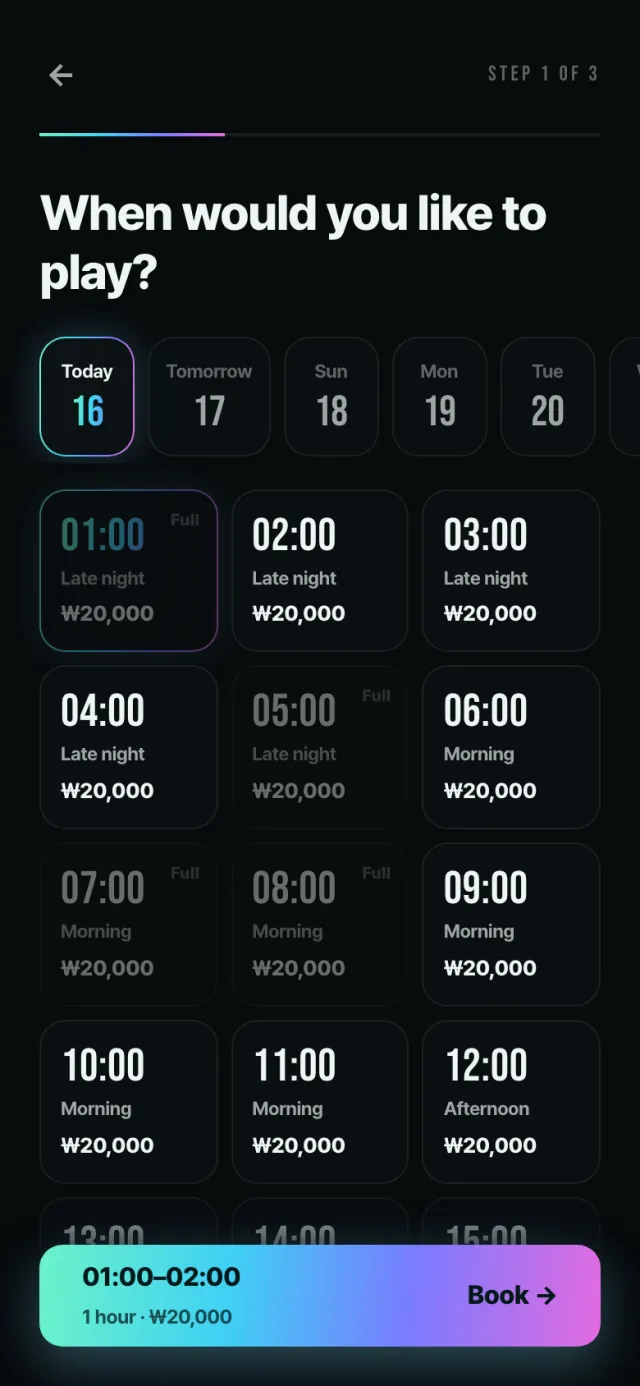
  1. Tap a date, then a time box. Tap the next box too to book several hours at once. Faded boxes are full. Tap Book at the bottom.

Book in the app — 3
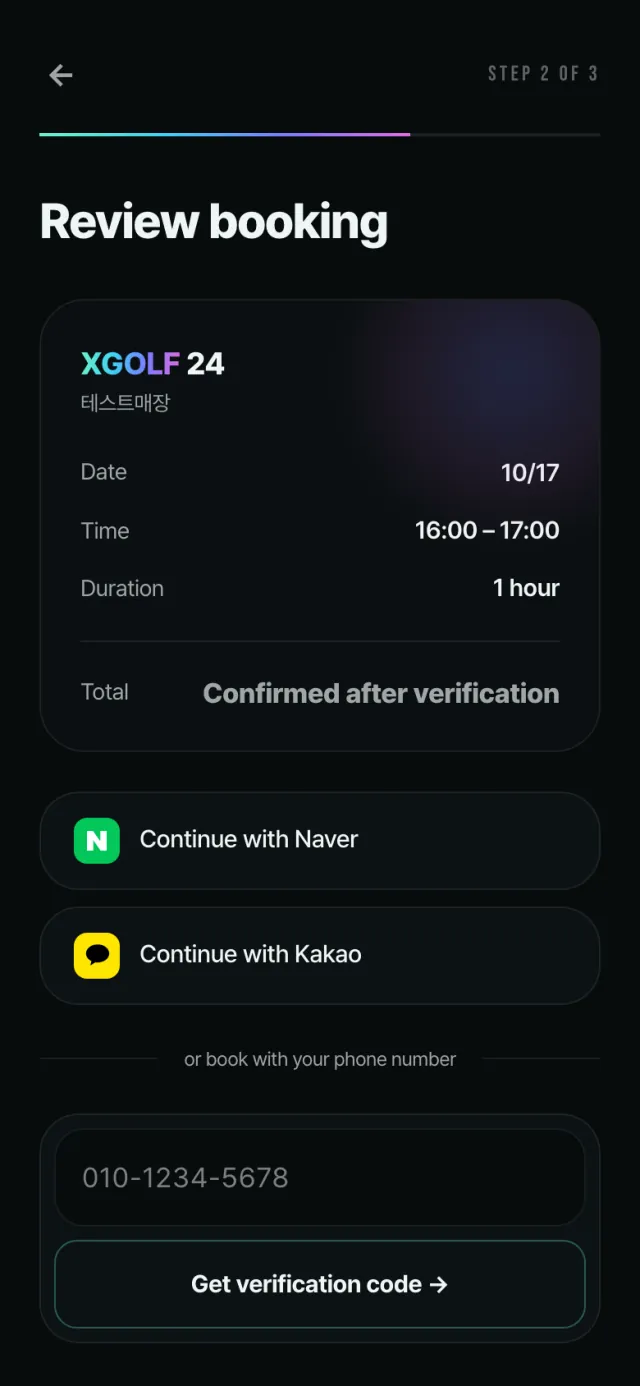
  1. First time? Verify yourself. Tap one of the buttons shown (such as Continue with Naver), or enter your phone number, tap Get verification code, type the code from the text, then Continue.

Book in the app — 4
  1. On Review booking, check the date, time and amount. Your time is held briefly until you pay.

Book in the app — 5
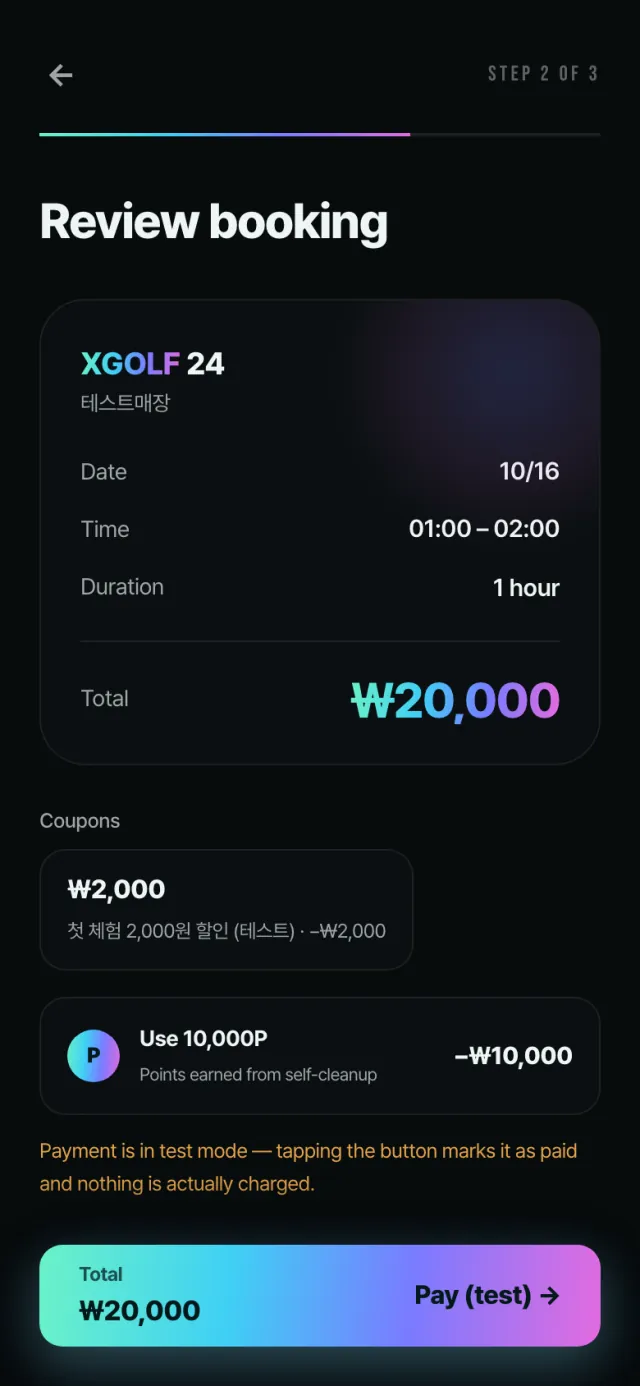
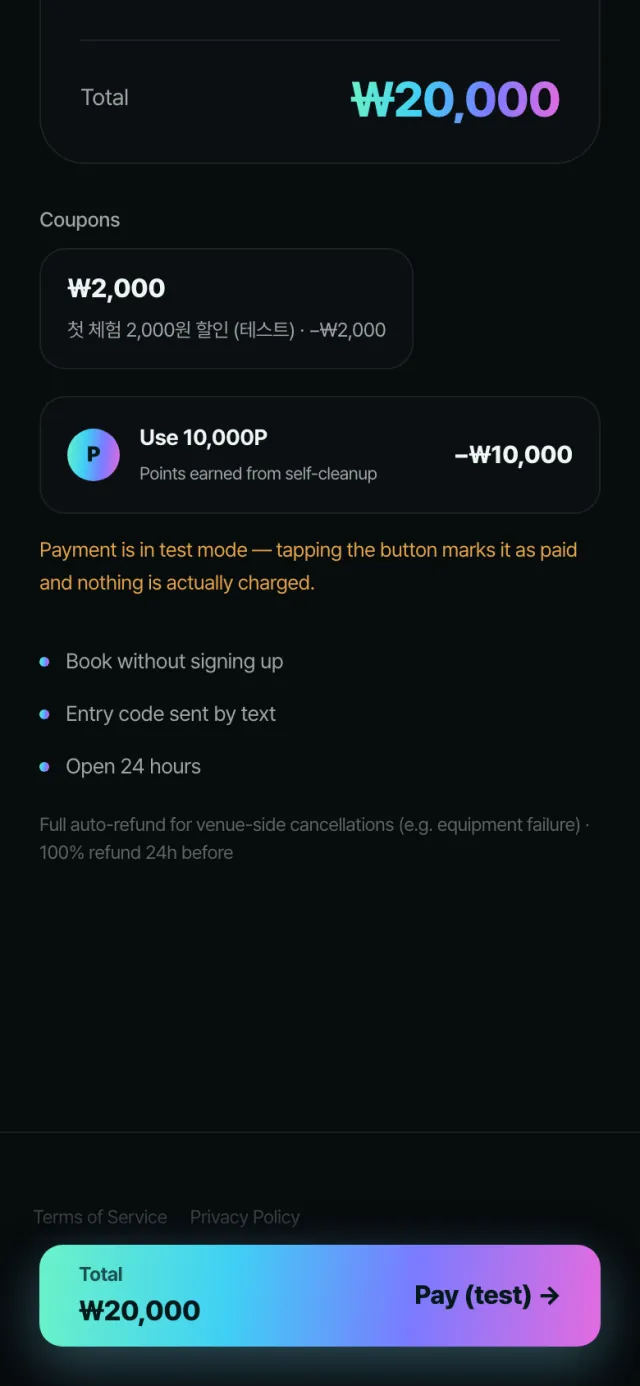
  1. Tap a coupon to apply it, and tap the points box to use your points. Check the total and tap Pay. (This is a test screen, so the button ends with “(test)”.)
Enter — your digital room key — 1
Enter — your digital room key — 2
Enter — your digital room key — 3
Enter — your digital room key — 4

1.2

Enter — your digital room key

4 steps

Enter — your digital room key — 1
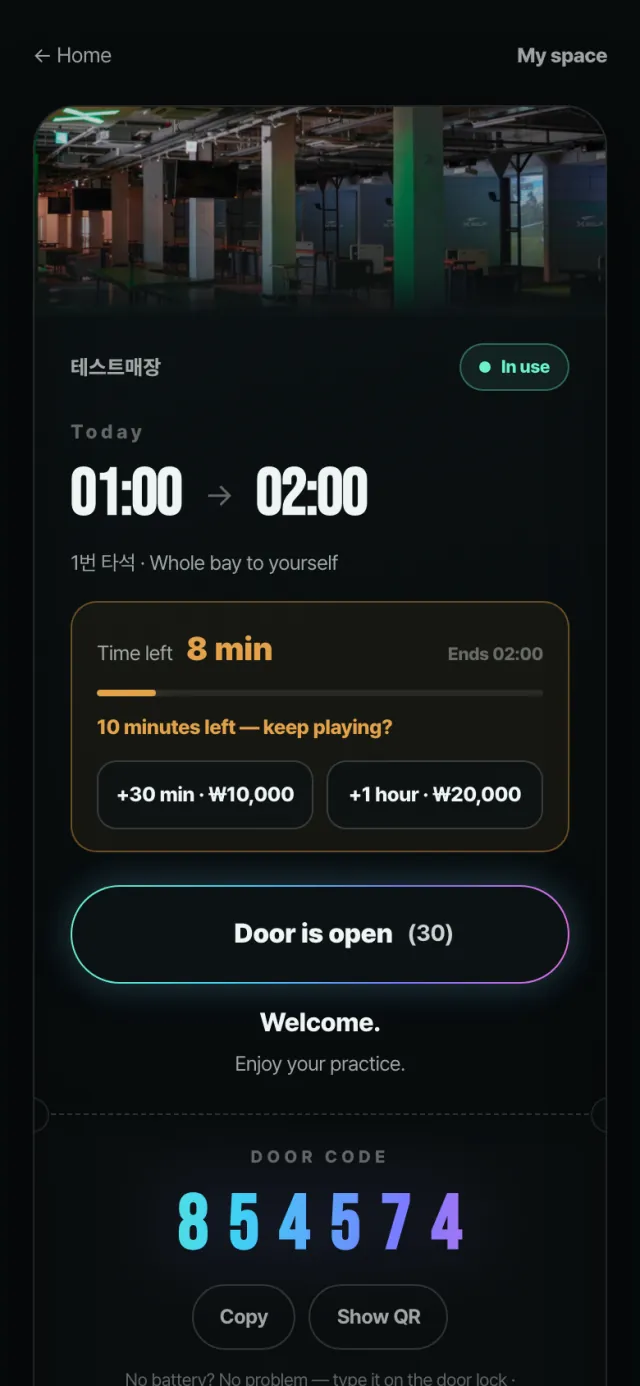
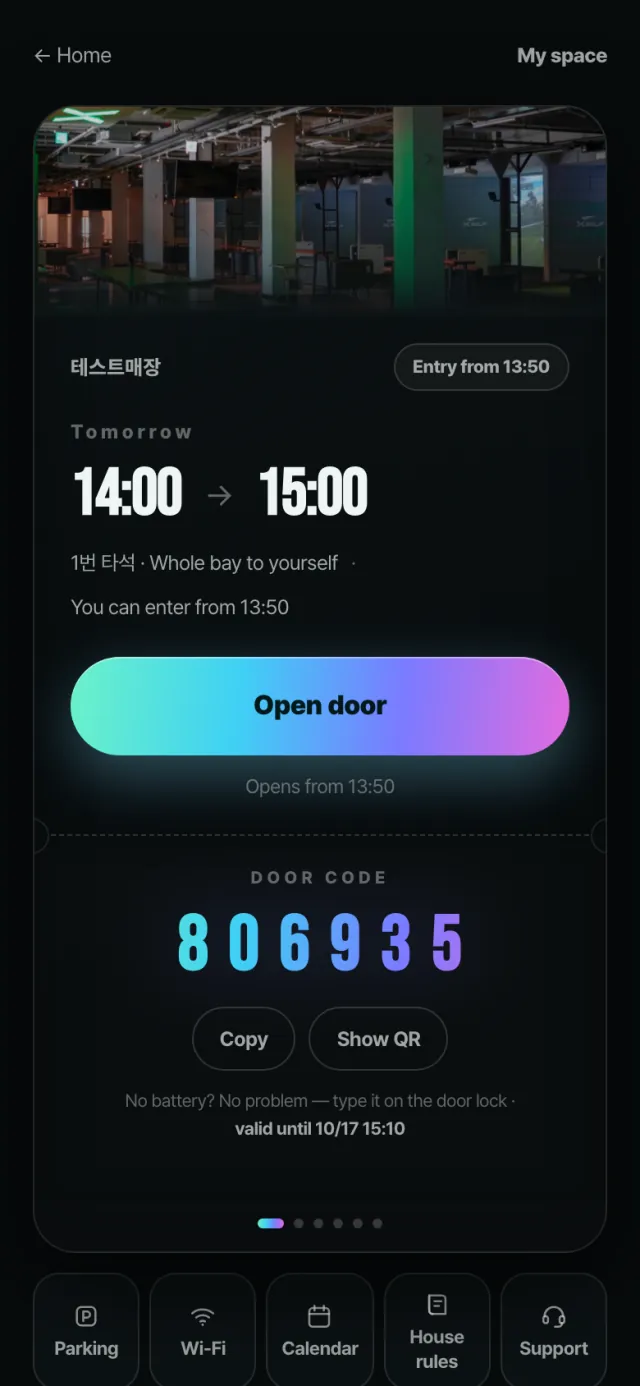
  1. After payment the room key opens right away, and the same link arrives by text. If the top right says “Entry from …”, it's still early. The door opens 10 min before your start time.

Enter — your digital room key — 2
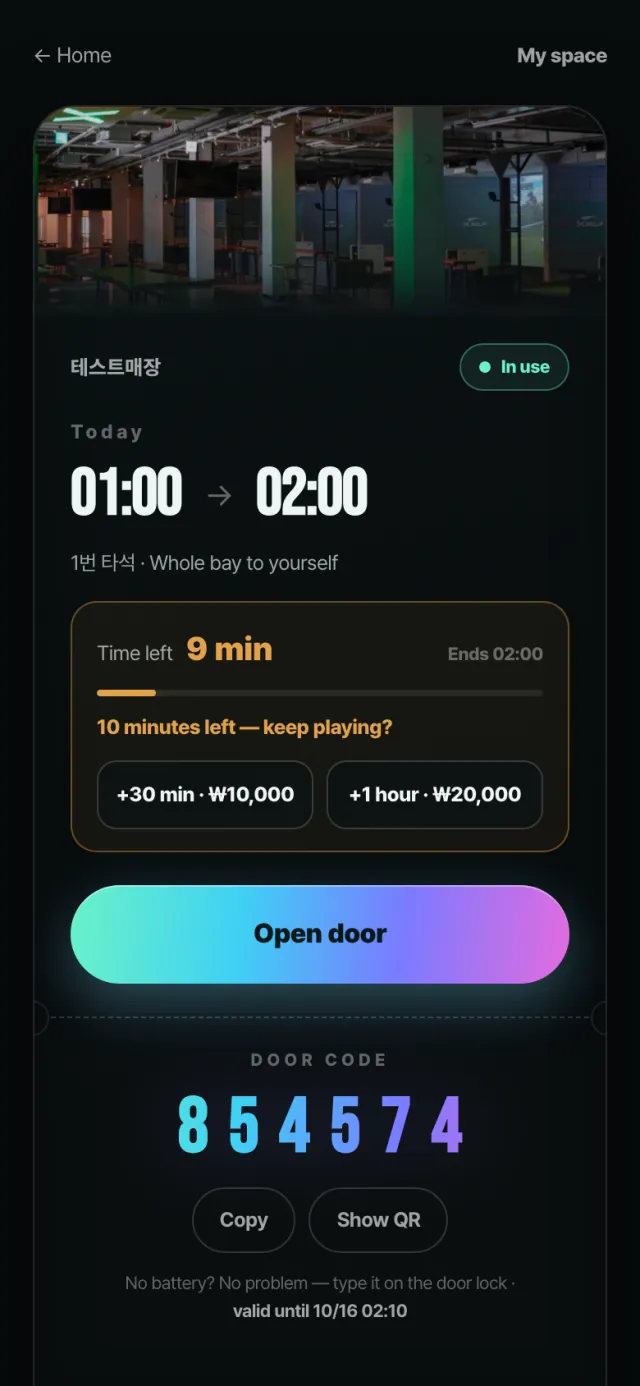
  1. At the door, tap Open door. While you play, the bar shows the time left.

Enter — your digital room key — 3
  1. When you see Door is open with a countdown, walk in. If it doesn't open, tap Try again; if it still fails, tap Request help — the control team opens it remotely.

Enter — your digital room key — 4
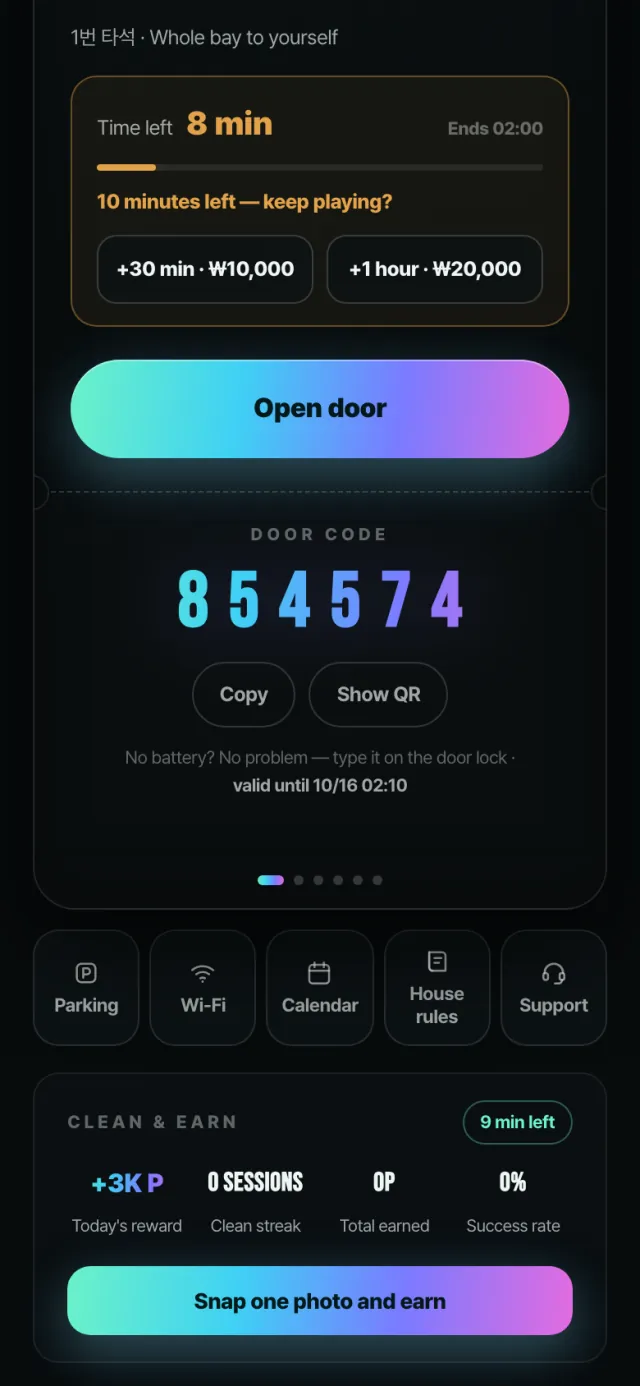
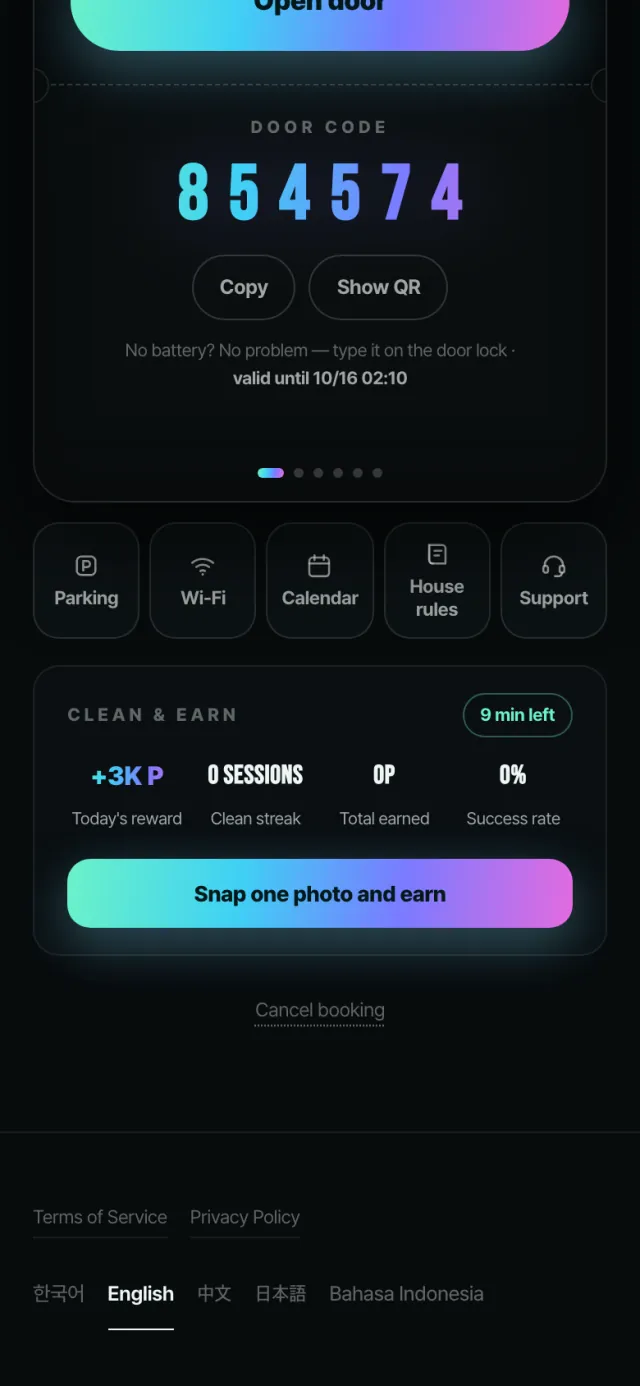
  1. No internet on your phone? Type the DOOR CODE digits on the door keypad. Use Copy for the number and Show QR for the entry QR. Swipe sideways for parking, Wi-Fi, house rules and receipt.
Extend · tidy up · leave — 1
Extend · tidy up · leave — 2
Extend · tidy up · leave — 3
Extend · tidy up · leave — 4

1.3

Extend · tidy up · leave

4 steps

Extend · tidy up · leave — 1
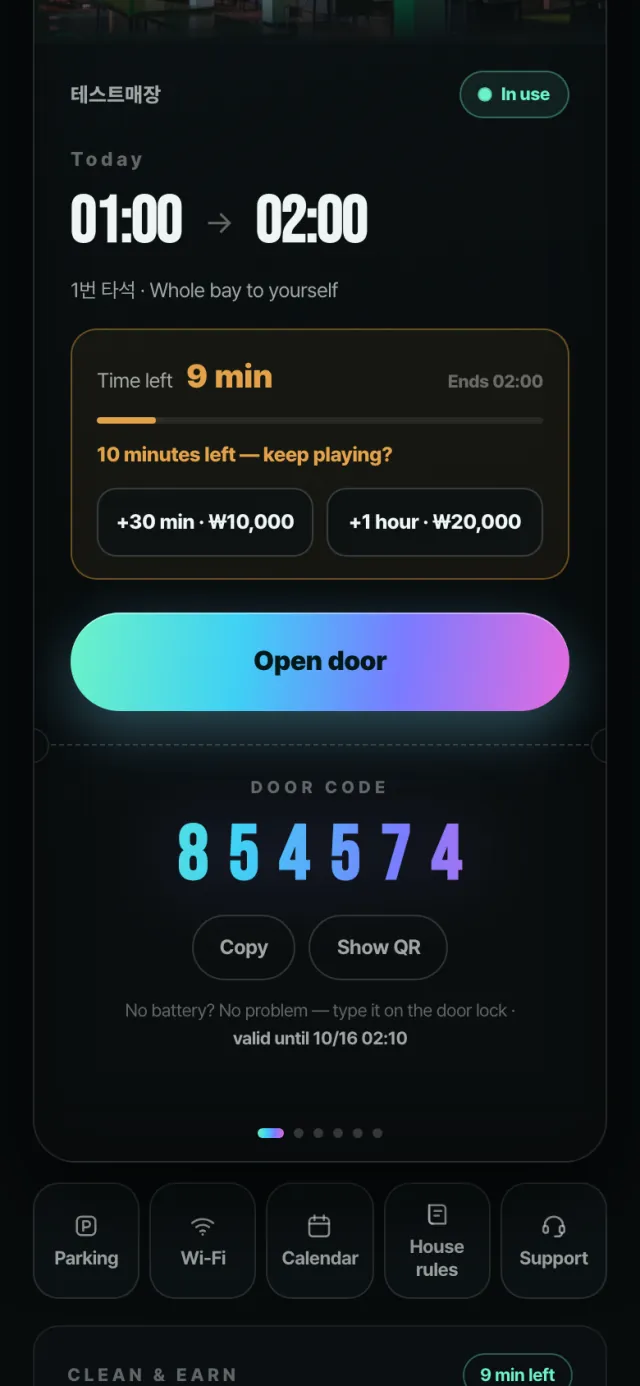
  1. Want more time? Tap +30 min · ₩10,000 or +1 hour · ₩20,000 in the time box. The extra time is charged and your end time moves. If the next hour is booked, these buttons don't appear.

Extend · tidy up · leave — 2
  1. Before you leave, tap Snap one photo and earn on the CLEAN & EARN card under the room key.

Extend · tidy up · leave — 3
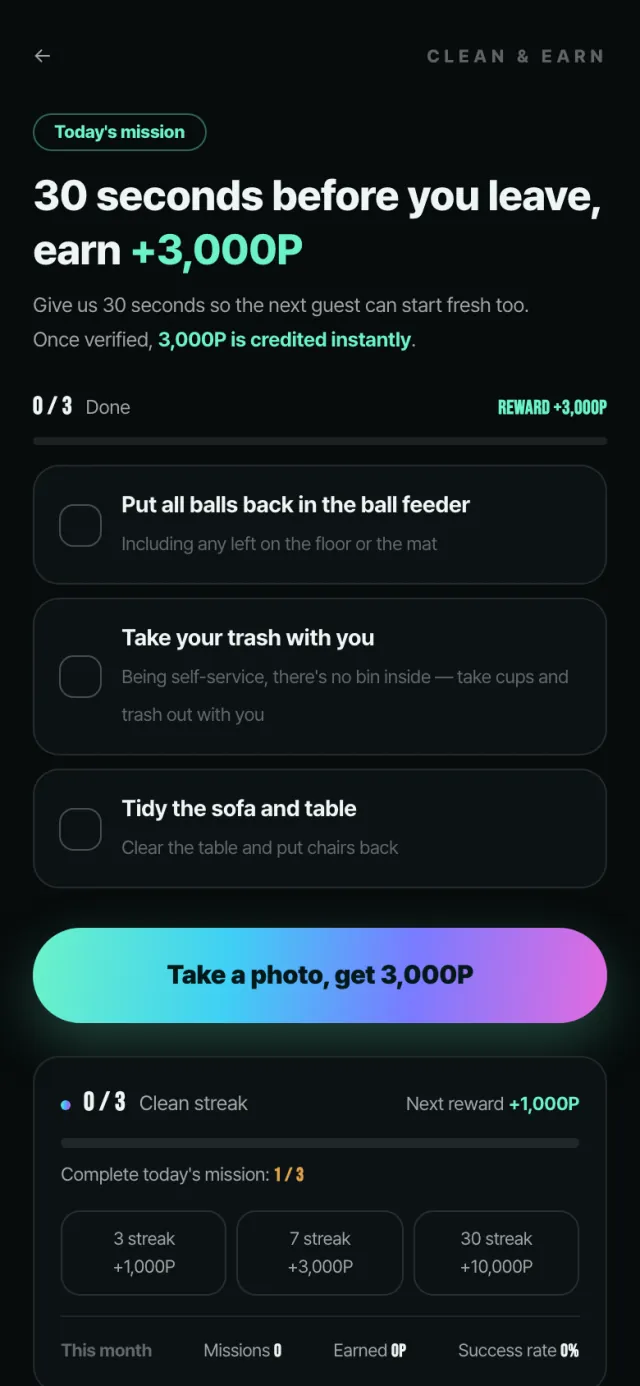
  1. Do the three tasks (balls, trash, sofa and table), check them, then upload a photo with Take a photo, get 3,000P. Points are added after review and can be used on your next payment.

Extend · tidy up · leave — 4
  1. After your time ends, the room key button becomes Open door (exit grace) for 10 minutes so you can open the door and leave. Check you have everything.
My bookings · cancel — 1
My bookings · cancel — 2
My bookings · cancel — 3

1.4

My bookings · cancel

3 steps

My bookings · cancel — 1
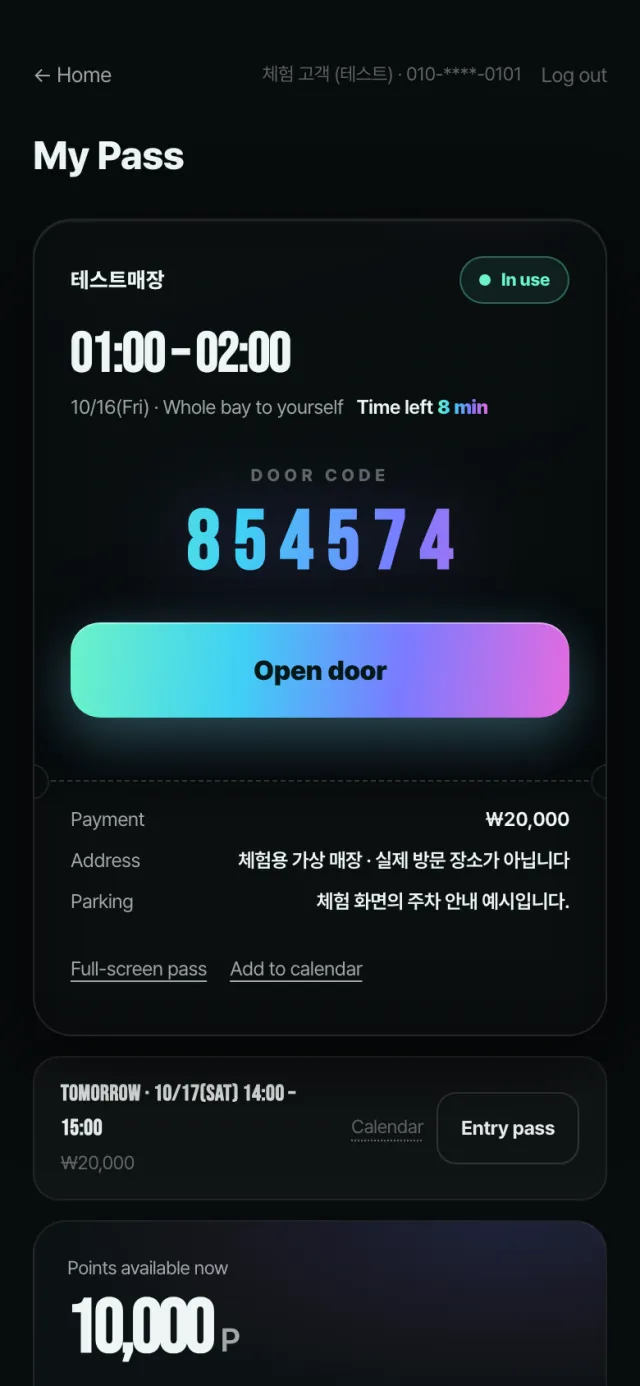
  1. Tap My bookings at the top right of the home screen to open My Pass. Your next booking's door code and Open door, points, coupons and past visits are all here.

My bookings · cancel — 2
  1. To cancel, open that booking's room key and tap Cancel booking at the very bottom.

My bookings · cancel — 3
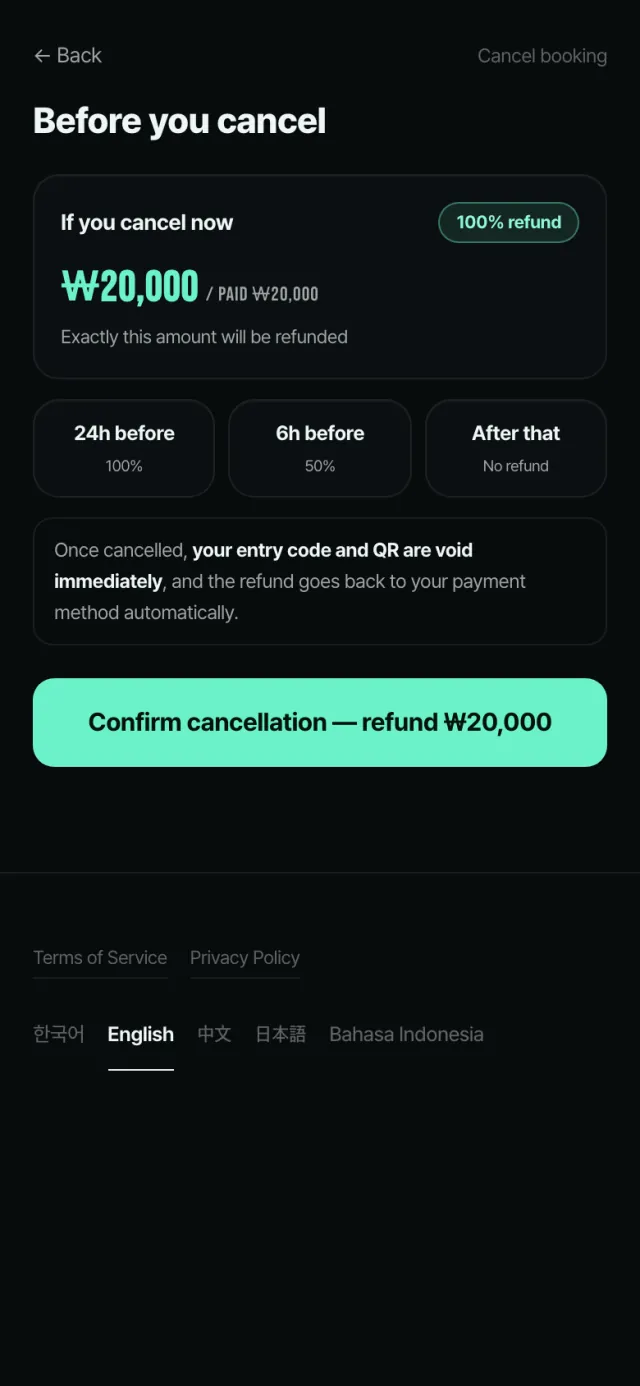
  1. It first shows how much you get back. Up to 24h before: 100%, up to 6h before: 50%, After that: No refund. If it's fine, tap Confirm cancellation — refund ₩20,000. The door code stops working at once.
Walk in at the kiosk (no booking) — 1
Walk in at the kiosk (no booking) — 2
Walk in at the kiosk (no booking) — 3
Walk in at the kiosk (no booking) — 4
Walk in at the kiosk (no booking) — 5
Walk in at the kiosk (no booking) — 6

1.5

Walk in at the kiosk (no booking)

6 steps

Walk in at the kiosk (no booking) — 1
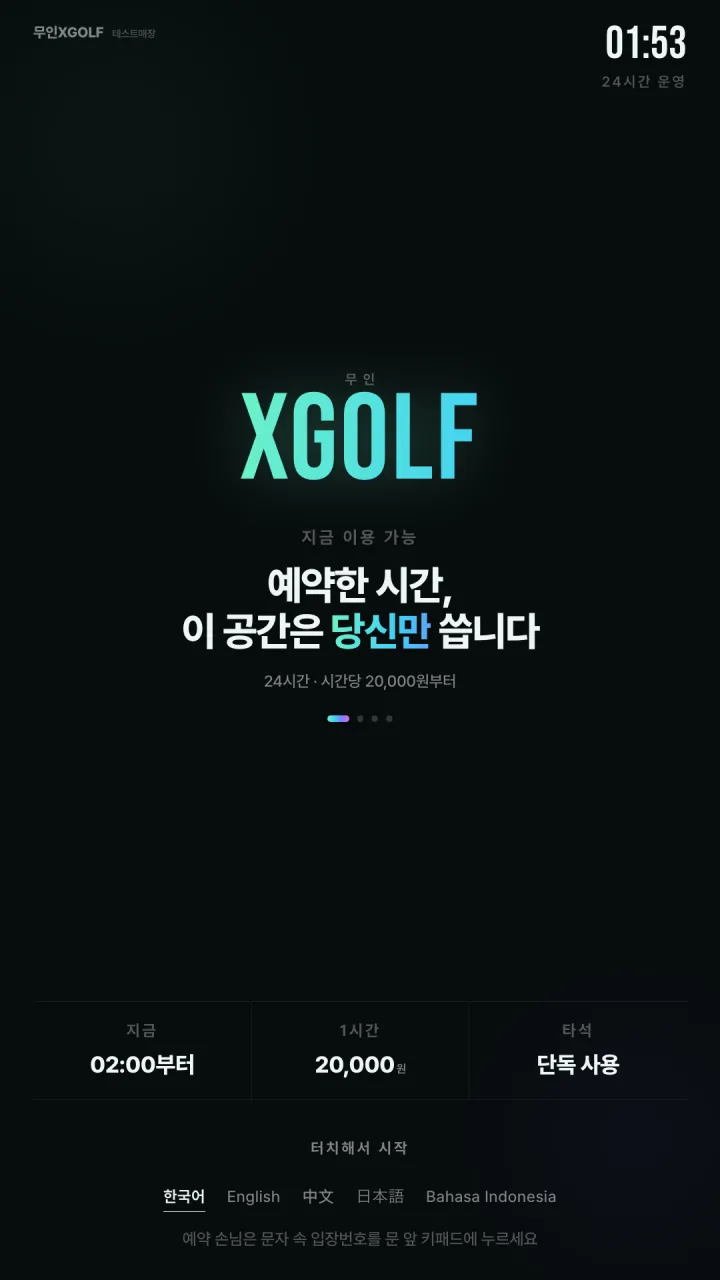
  1. Touch the kiosk screen at the entrance. Tap a language name at the bottom to start in that language. (If you booked, just type the code from your text on the keypad.)

Walk in at the kiosk (no booking) — 2
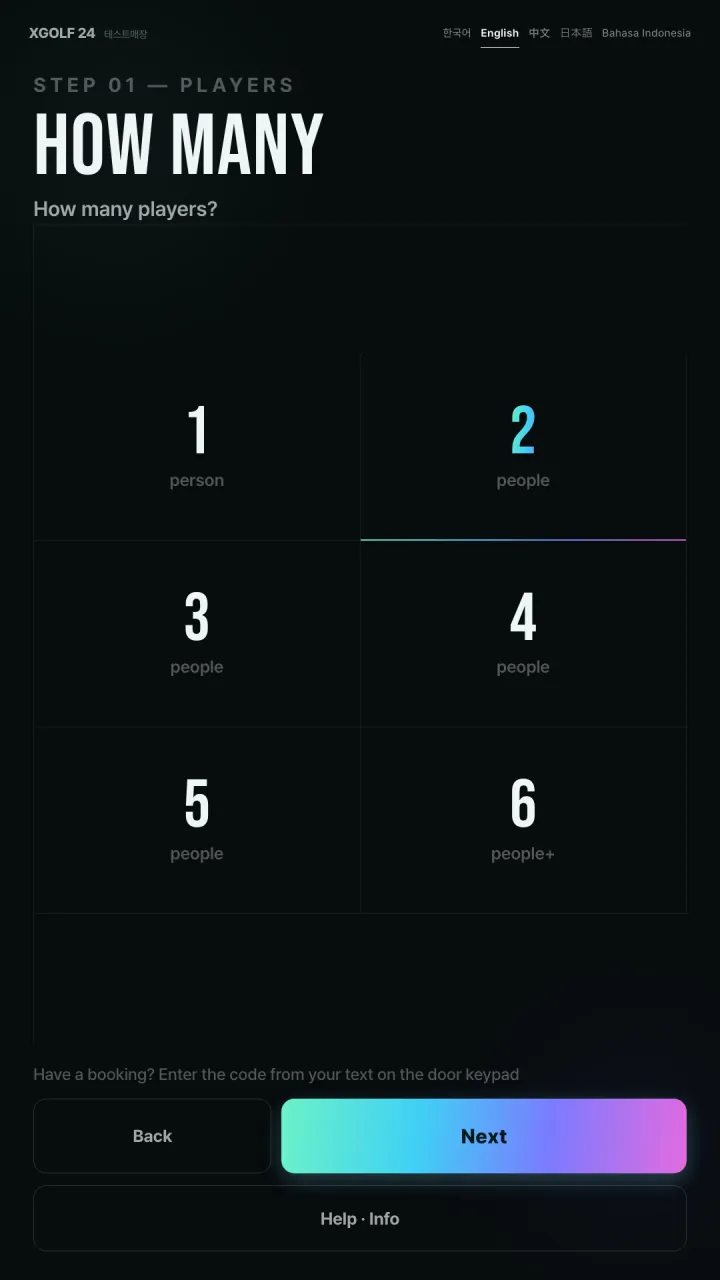
  1. Tap how many players, then Next. Change the language anytime from the names at the top.

Walk in at the kiosk (no booking) — 3
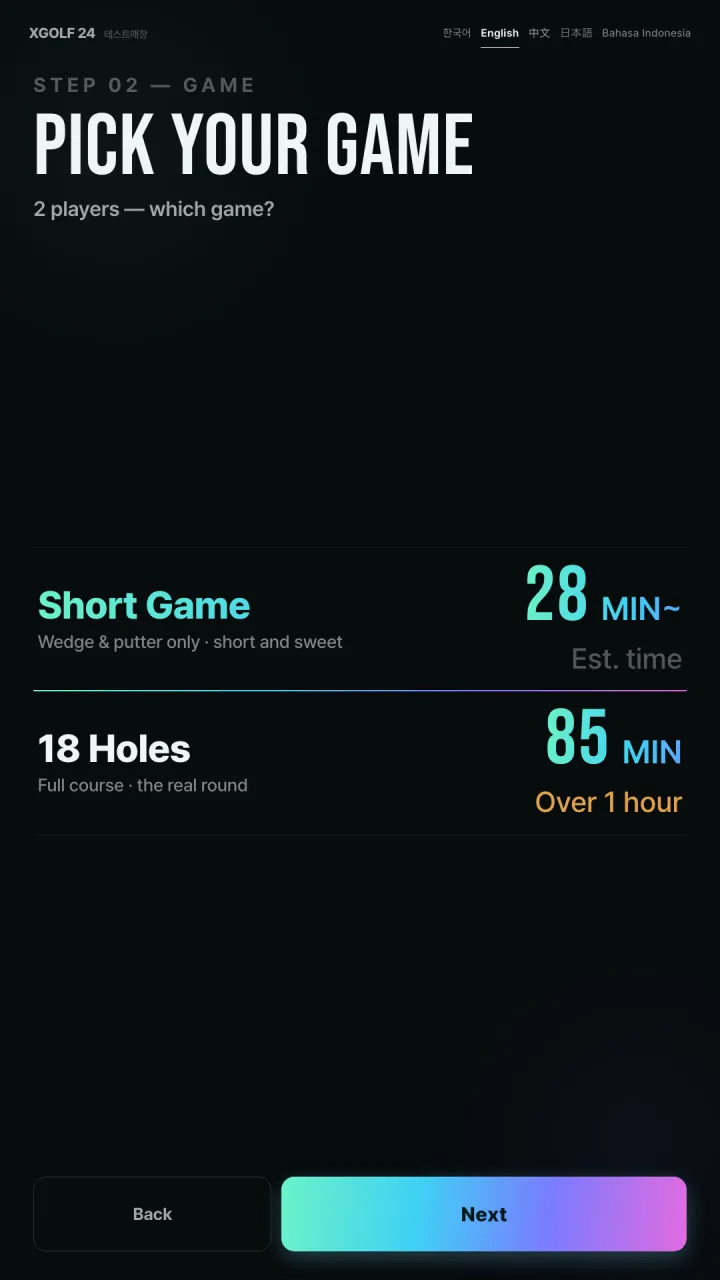
  1. Pick a game to see the expected time; over one hour is flagged. Tap Next.

Walk in at the kiosk (no booking) — 4
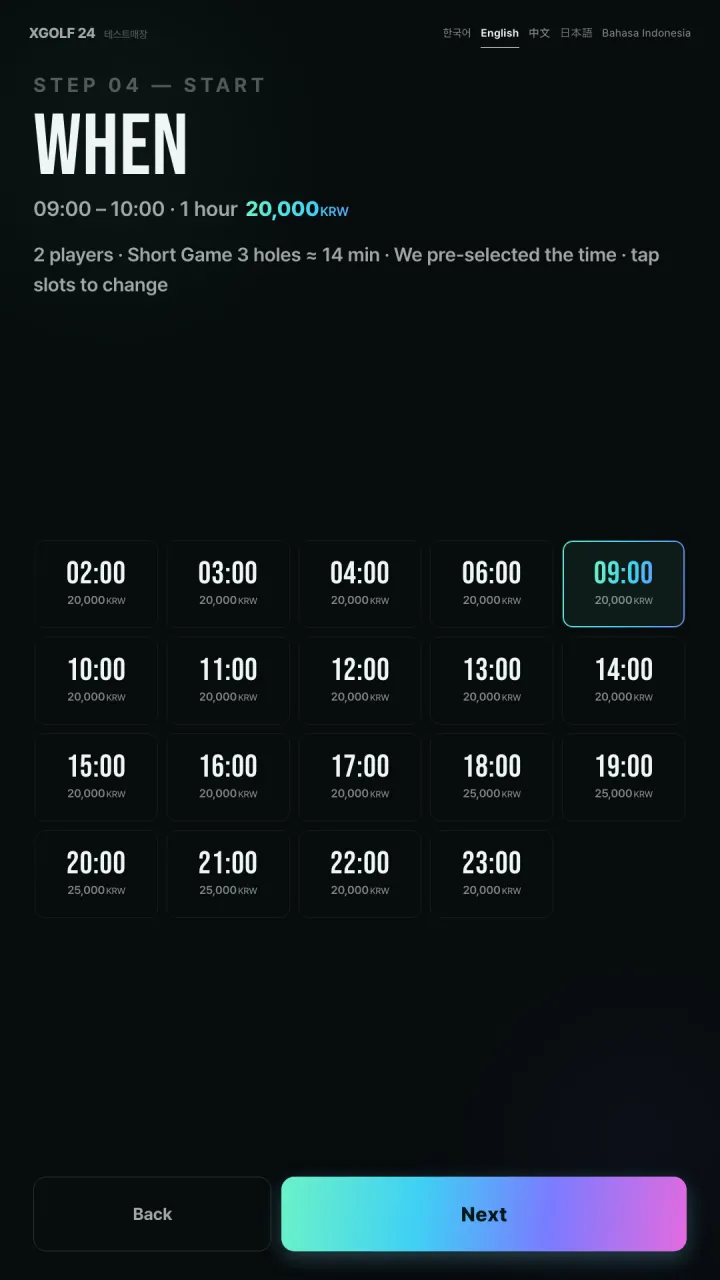
  1. A time is already picked for you. Tap boxes to change it; if Start now shows, you can go in right away. Tap Next.

Walk in at the kiosk (no booking) — 5
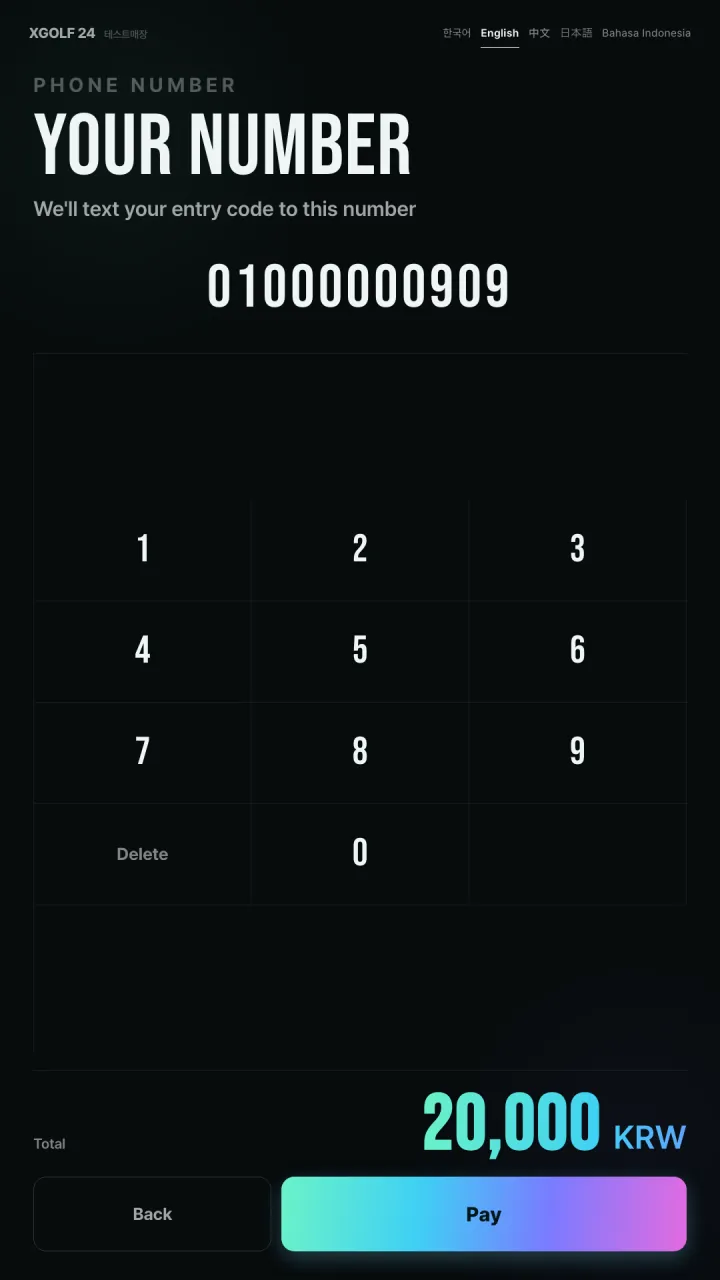
  1. Enter the phone number for the entry text, tap Pay, then insert your card in the reader.

Walk in at the kiosk (no booking) — 6
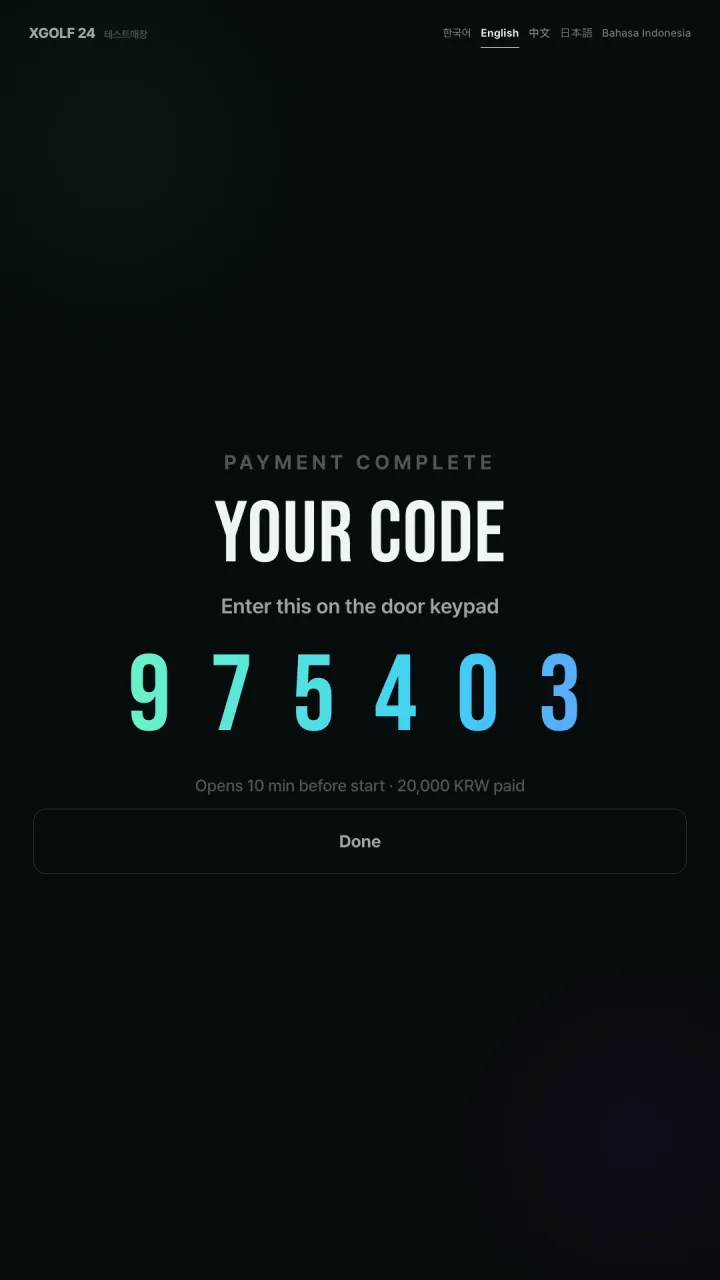
  1. Type the YOUR CODE digits: Enter this on the door keypad. The same code comes by text. Done returns to the start screen.
Prize challenge · table tablet — 1
Prize challenge · table tablet — 2

1.6

Prize challenge · table tablet

2 steps

Prize challenge · table tablet — 1
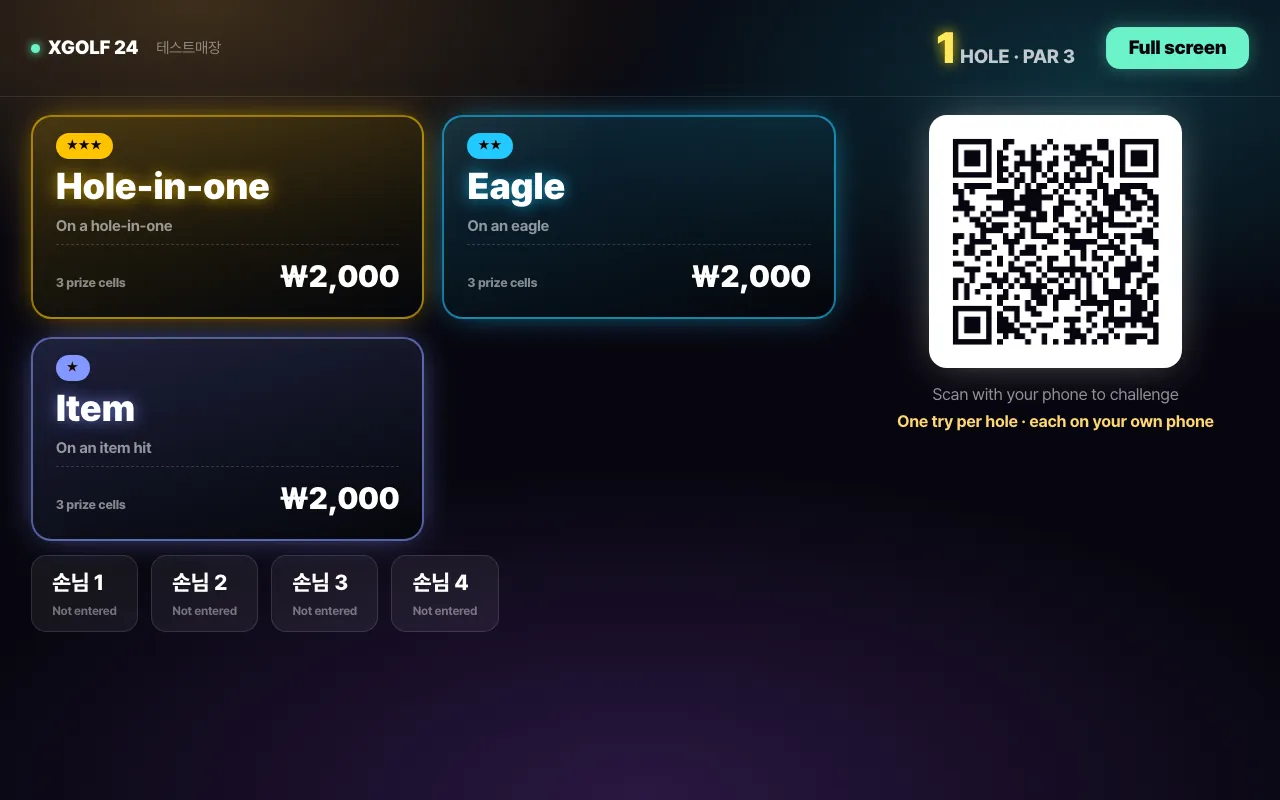
  1. The tablet by the bay shows the challenge prizes (hole-in-one, eagle, item). When a hole starts in the game, a large QR appears here. You pay on your own phone, not on the tablet.

Prize challenge · table tablet — 2
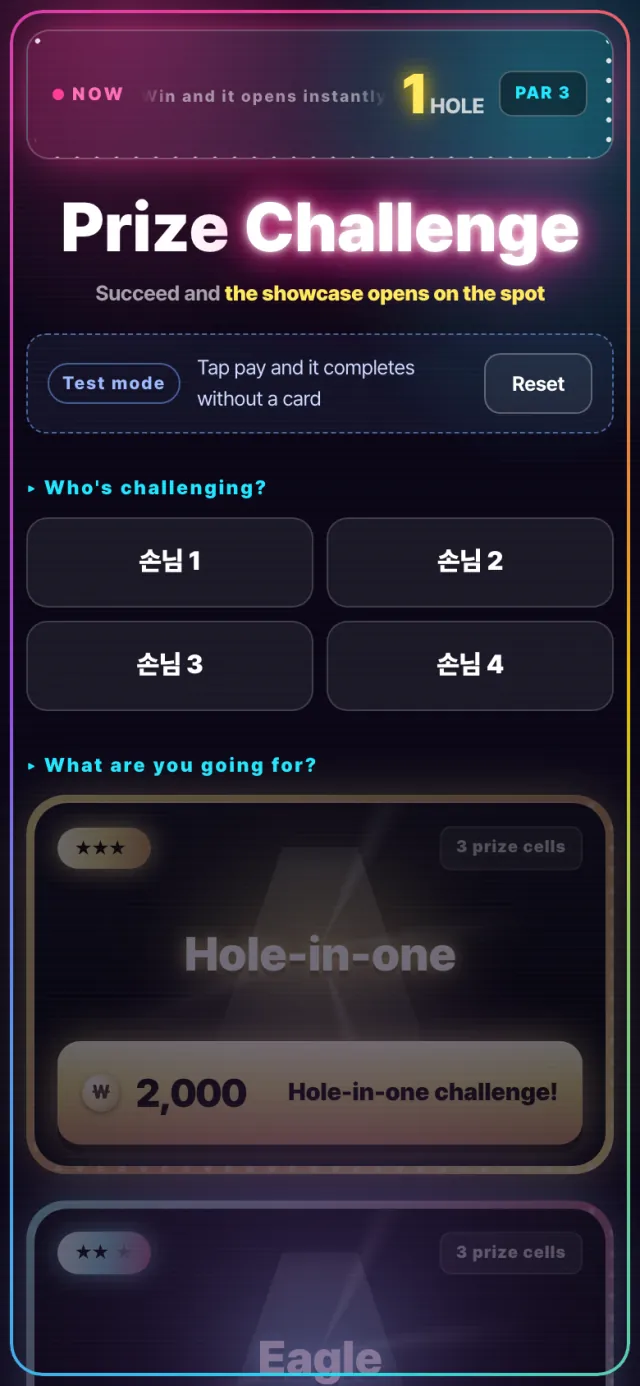
  1. Scan the QR to open Prize challenge. Under Who's challenging? tap your name, pick a prize and pay. One try per person per hole. If you succeed, the prize cabinet opens on the spot.

CHAPTER 02

Venue operators (console)

Watch, unlock, fix and close the day from the console — without going to the venue.

  1. 2.1Log in · language
  2. 2.2Reading the dashboard
  3. 2.3Remote actions — door · AC
  4. 2.4Booking details · cancel · refund
  5. 2.5Customers tab
  6. 2.6Rates · coupons
  7. 2.7Automation — AC · power rules
  8. 2.8Revenue · settlement · daily close
  9. 2.9Venue settings — hours · info

2.1

Log in · language

2 steps

/console/login
Log in · language — 1
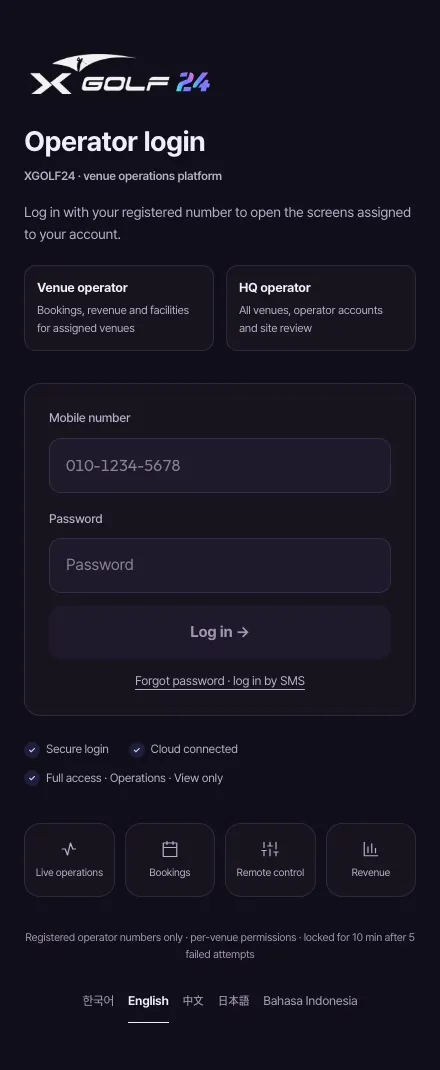
  1. Open /console/login on the console address. Enter your registered phone number and password, then Log in. Forgot it? Use Forgot password · log in by SMS. Five wrong tries lock you out for 10 minutes.

/console/‹venue›
Log in · language — 2
  1. Change the language right next to your name in the header (한국어 · English · 中文 · 日本語 · Bahasa Indonesia). This browser remembers it. When done, Log out.

2.2

Reading the dashboard

5 steps

/console/‹venue›
Reading the dashboard — 1
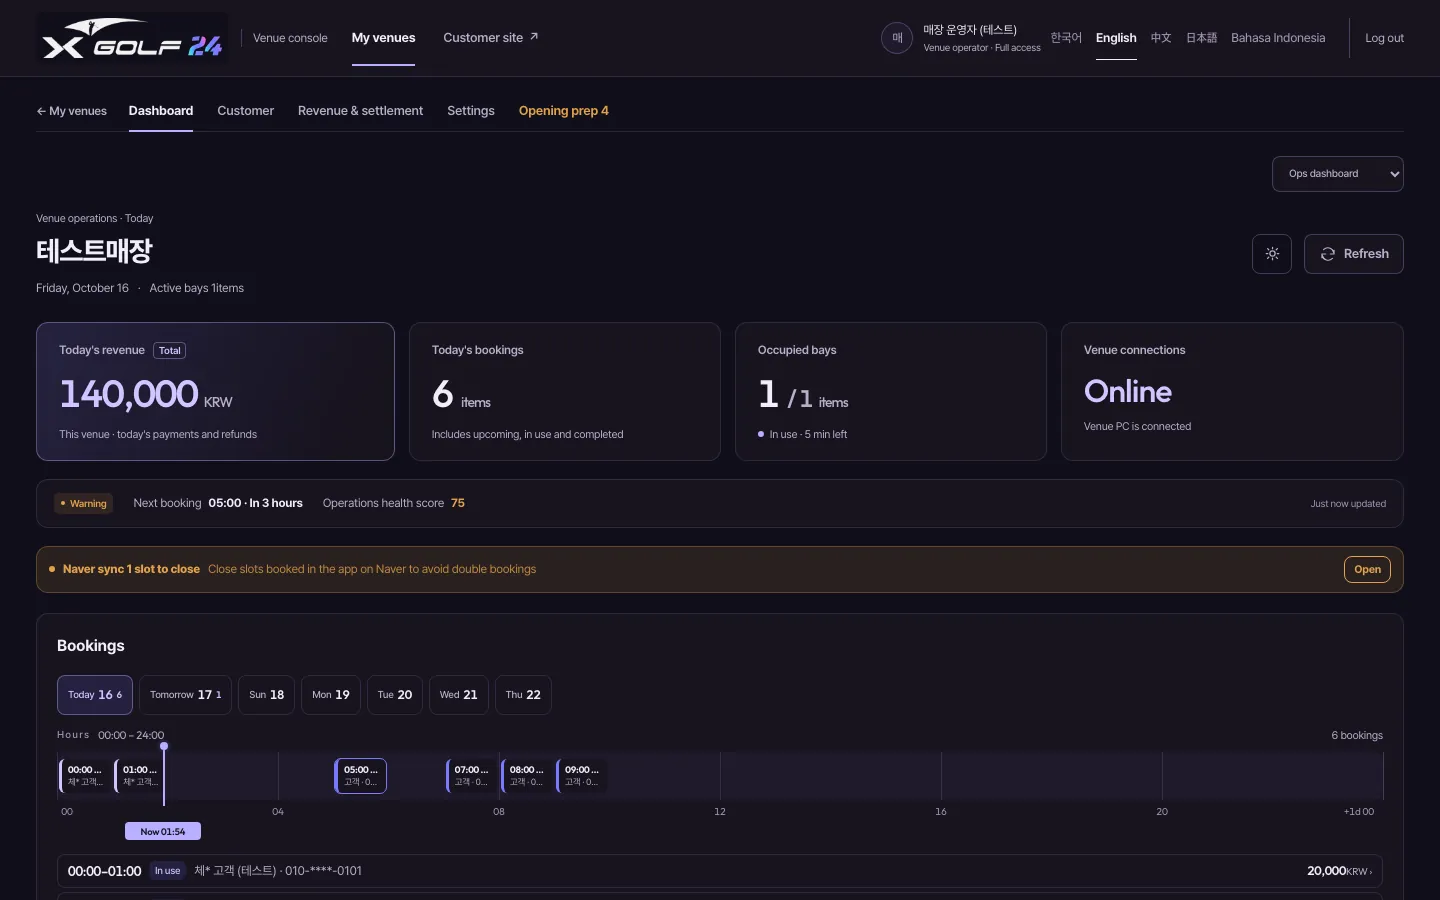
  1. After login the venue Dashboard opens. Top four tiles: Today's revenue · Today's bookings · Occupied bays · Venue connections. The line below is the status bar (next booking, ops score).

  2. Yellow or red alert lines appear under the status bar only when something is wrong (e.g. a guest paid but couldn't enter, the venue PC is offline). Handle alerts first.

/console/‹venue›
Reading the dashboard — 3
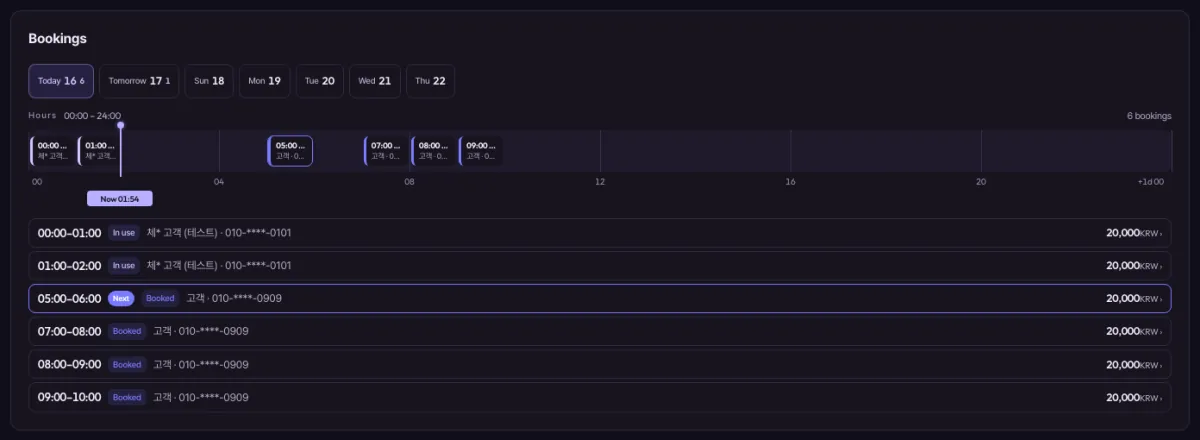
  1. Bookings: tap a date chip to see that day as a bar and a list. The purple vertical line is now. Tap a block or a row to open Booking details.

/console/‹venue›
Reading the dashboard — 4
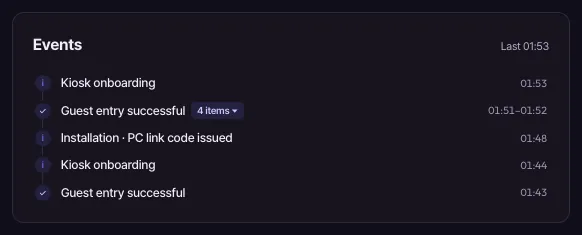
  1. Events: door openings, device actions, bookings and more, in time order. Tap a count badge to expand repeated events.

/console/‹venue›
Reading the dashboard — 5
  1. CCTV: once the venue PC is connected, camera feeds appear here. If none yet, you see a hint (setup is in chapter 3).

2.3

Remote actions — door · AC

3 steps

/console/‹venue›
Remote actions — door · AC — 1
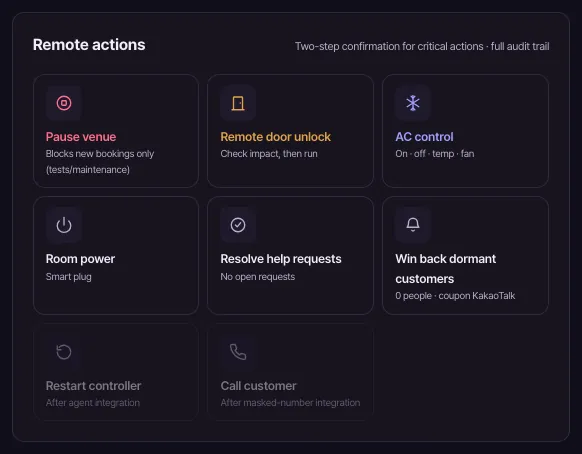
  1. Handle the venue remotely from the Remote actions card. Faded cards (Restart controller · Call customer) are Coming soon and can't be used yet.

/console/‹venue›
Remote actions — door · AC — 2
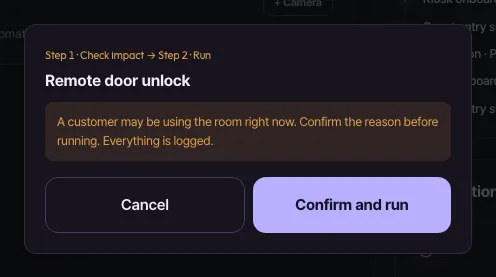
  1. Remote door unlock shows a confirmation first. A guest may be inside, so check the reason, then Confirm and run. Every action is logged.

/console/‹venue›
Remote actions — door · AC — 3
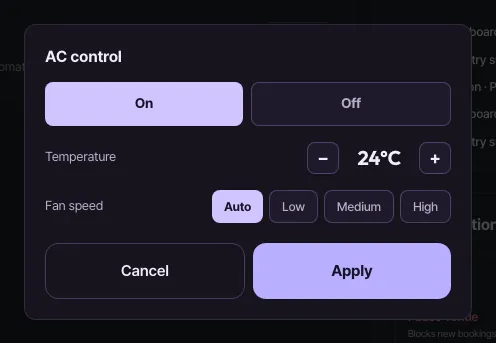
  1. AC control: choose On/Off, Temperature and Fan speed, then Apply. Room power switches the smart plug.

2.4

Booking details · cancel · refund

3 steps

/console/‹venue›
Booking details · cancel · refund — 1
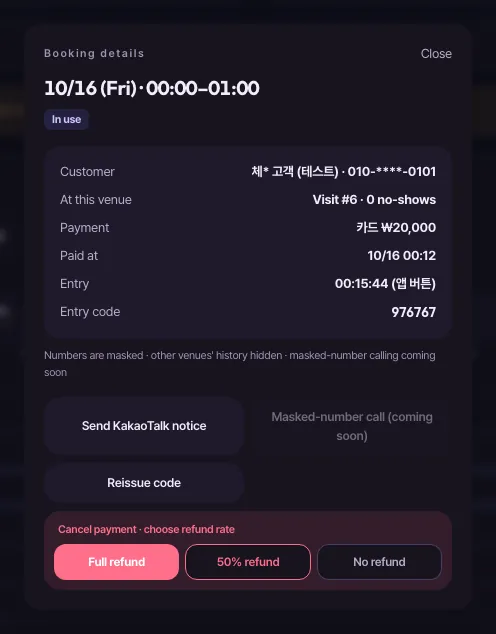
  1. Booking details shows the customer (number masked), payment, entry time and door code. Other venues' history is never shown.

  2. Guest's code not working? Reissue code. The new code reaches the door within a minute — tell the guest. Send messages with Send KakaoTalk notice (approved templates only).

  3. To cancel, pick Full refund · 50% refund · No refund under Cancel payment · choose refund rate, then confirm. It can't be undone, so check the amount.

2.5

Customers tab

1 steps

/console/‹venue›/customers
Customers tab — 1
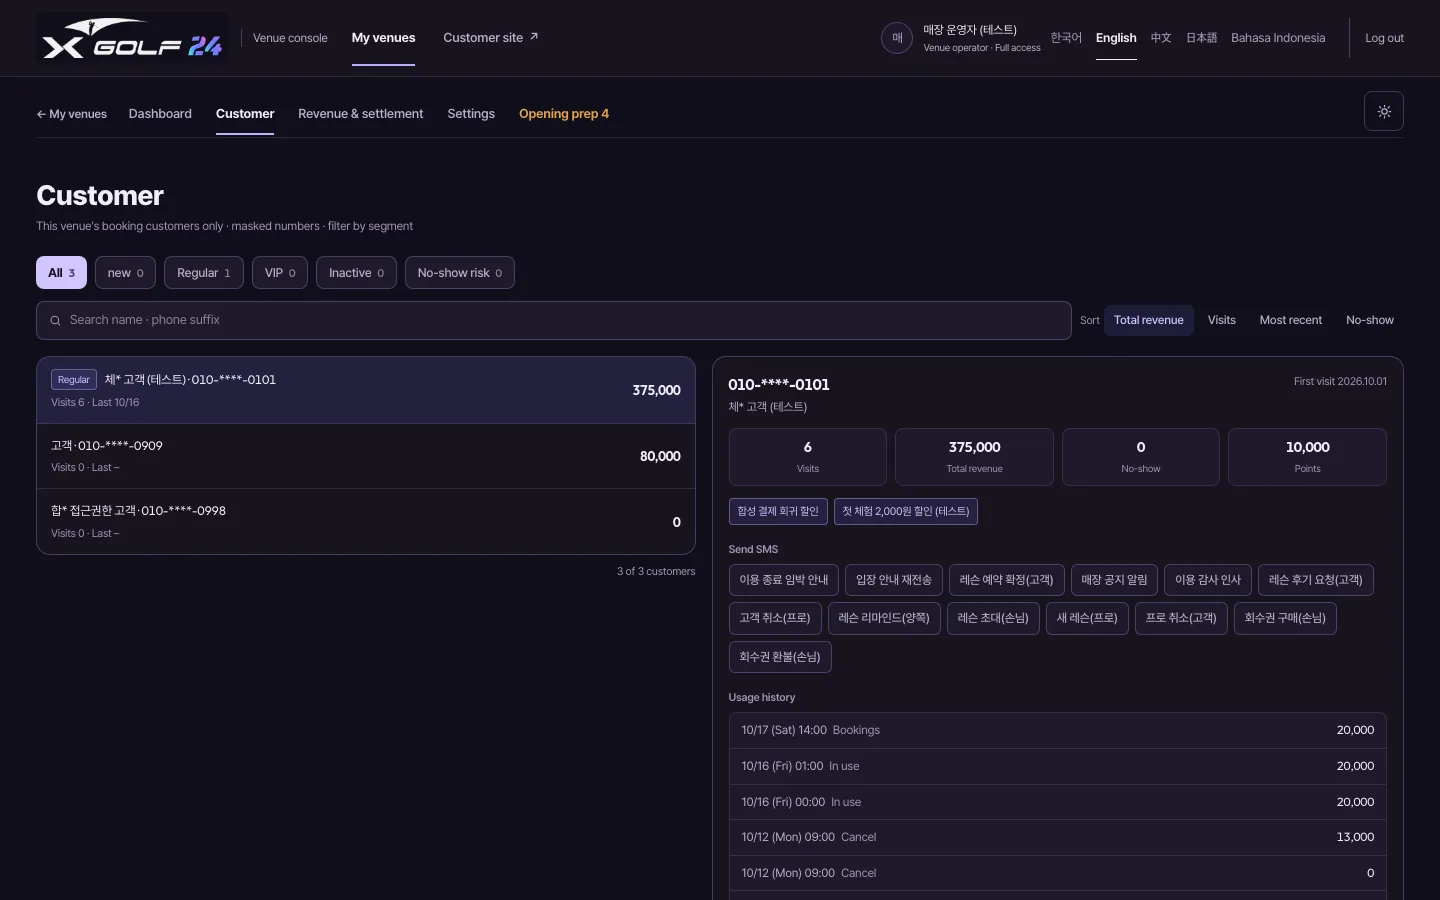
  1. The Customer tab lists only guests who booked at this venue. Filter with the chips (new, regulars, VIP, dormant) and search by name or the last digits. Click someone to see visits, spend, and coupon and message buttons on the right.

2.6

Rates · coupons

3 steps

/console/‹venue›/settings
Rates · coupons — 1
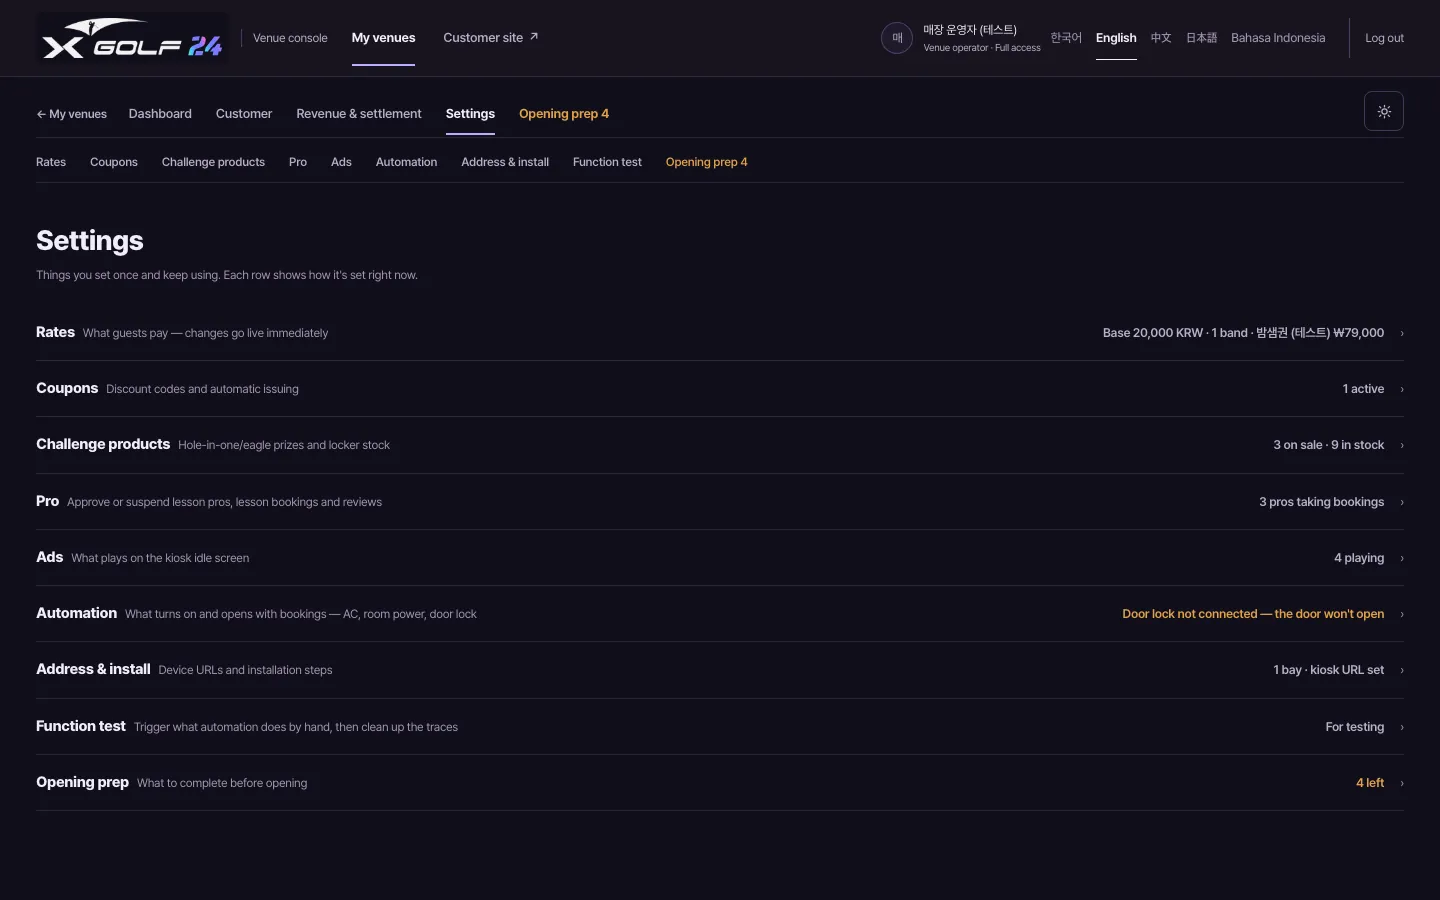
  1. Everything you set once and change rarely lives in Settings. Each row shows its current value on the right, so you know the state without opening it.

/console/‹venue›/rates
Rates · coupons — 2
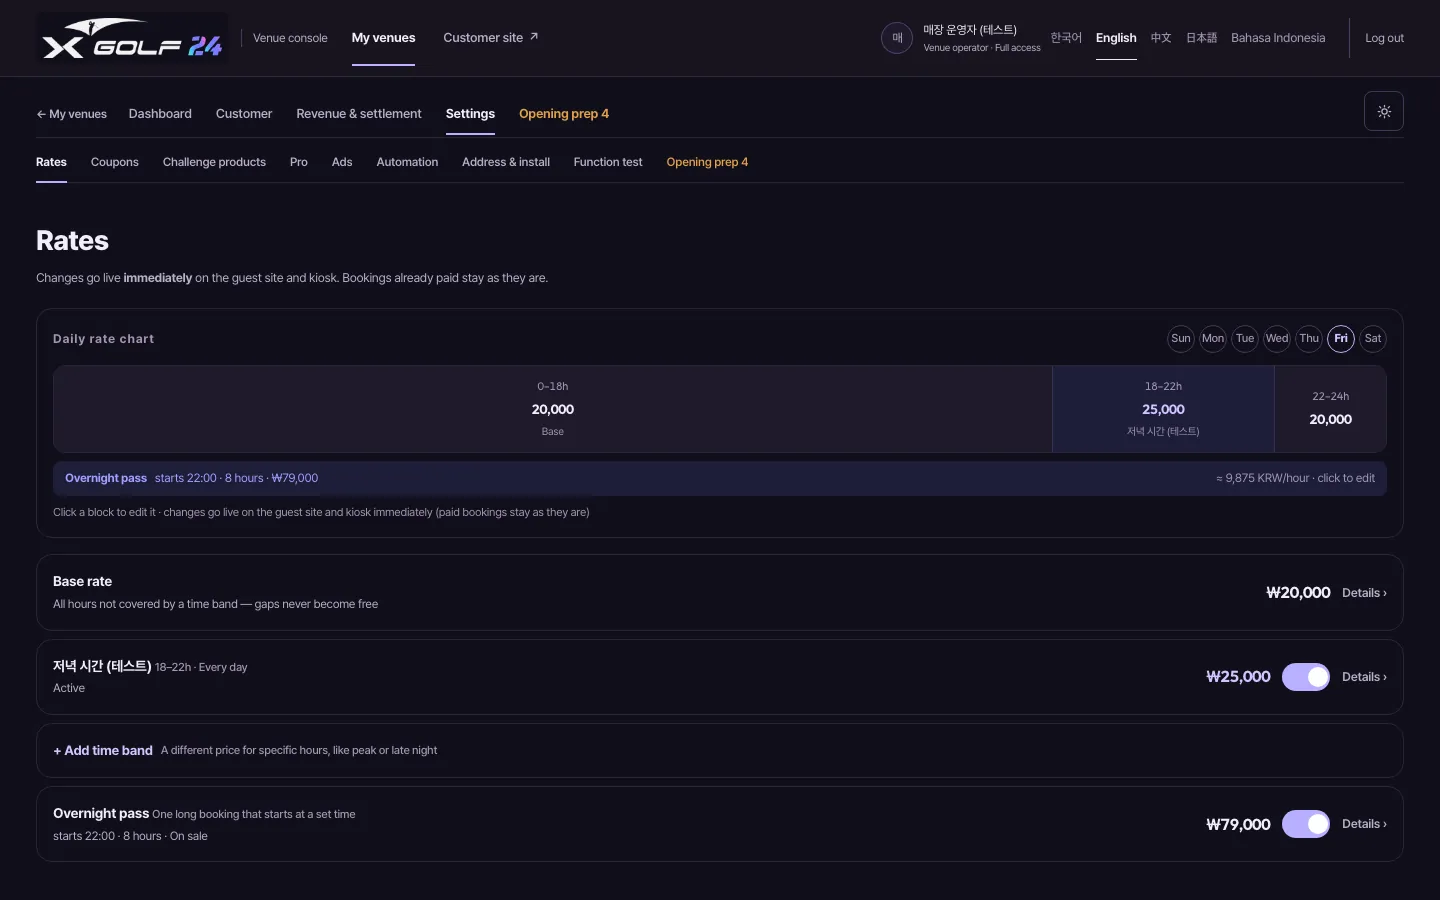
  1. Rates: click a block in Daily rate chart to edit it. For a different price at certain hours (peak, late night), use + Add time band. Changes go live on the guest site and kiosk at once; paid bookings stay as they are.

/console/‹venue›/coupons
Rates · coupons — 3
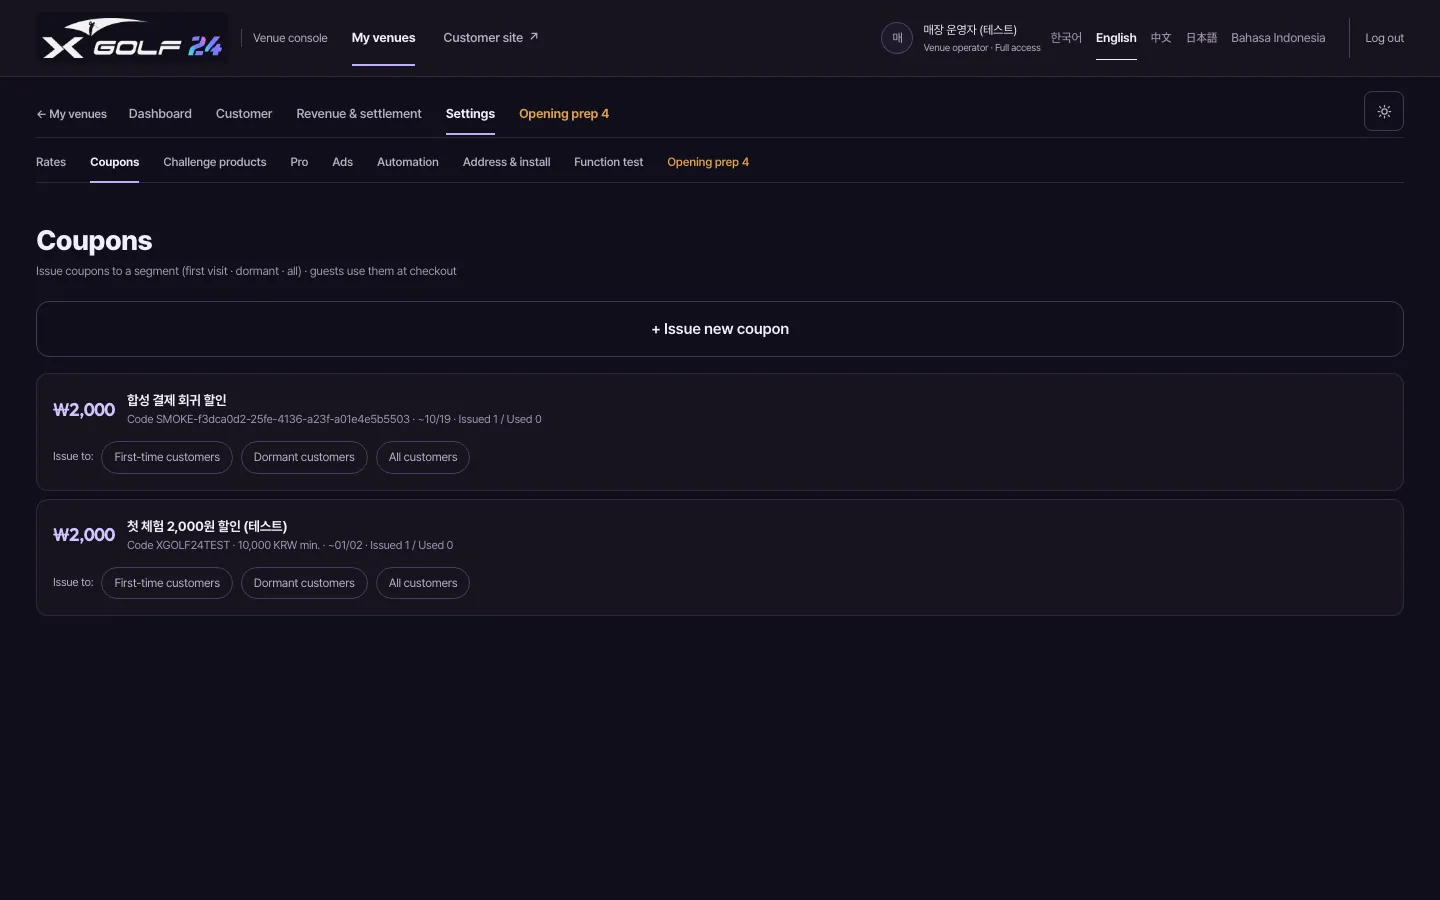
  1. Coupons: create one with + Issue new coupon (amount and conditions). Under a coupon, click First-time customers · Dormant customers · All customers to give it to that group. Guests use it at payment.

2.7

Automation — AC · power rules

1 steps

/console/‹venue›/climate
Automation — AC · power rules — 1
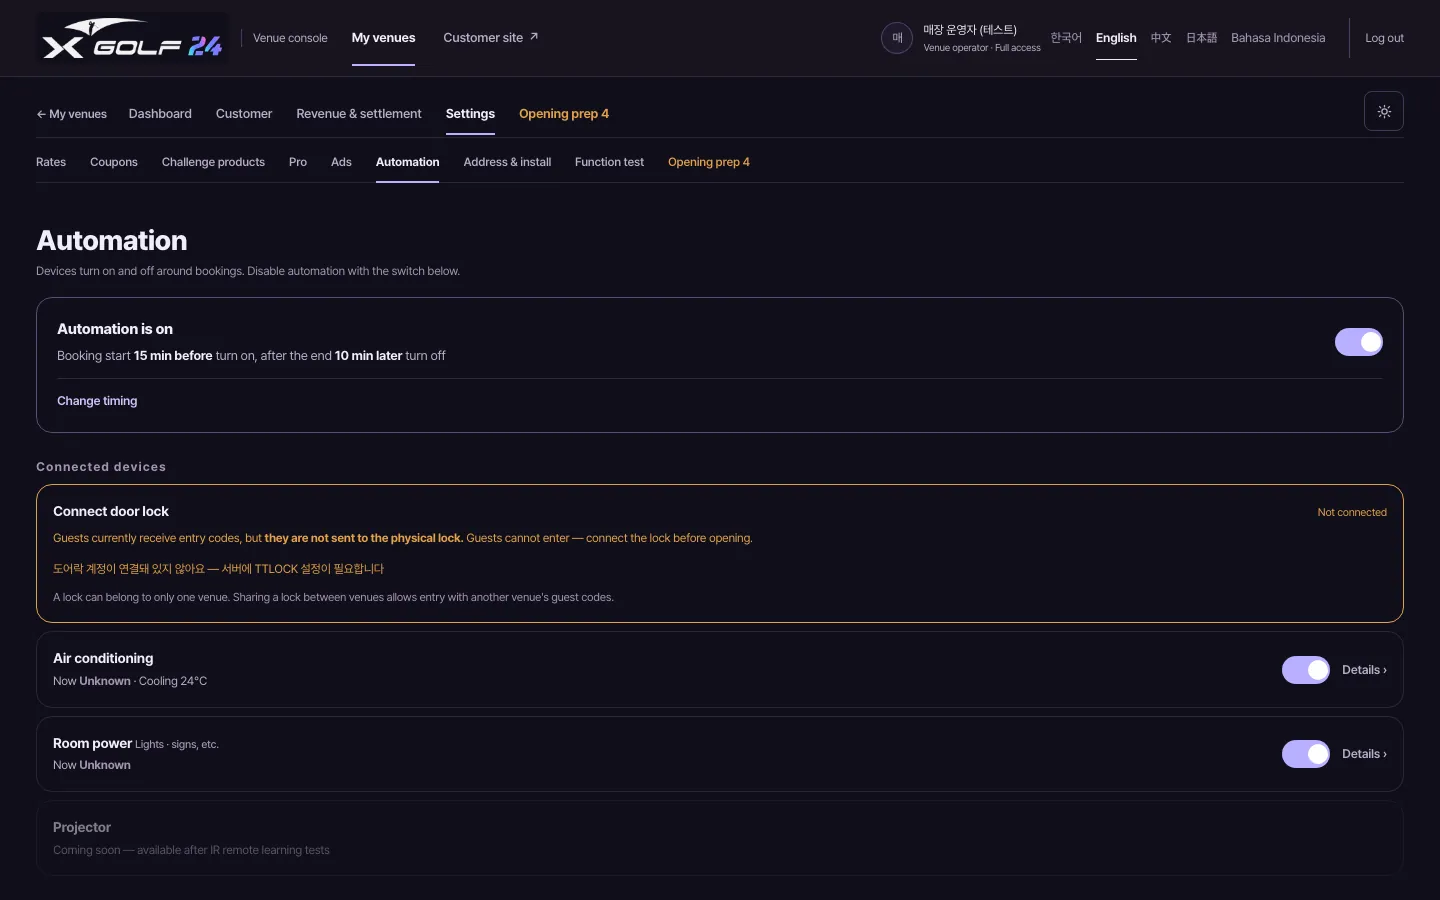
  1. Automation turns devices on and off with bookings. By default: on 15 minutes before start, off 10 minutes after the end — adjust with Change timing. Each device has a switch and Details; a yellow warning shows if the door lock isn't connected.

2.8

Revenue · settlement · daily close

3 steps

/console/‹venue›/report
Revenue · settlement · daily close — 1
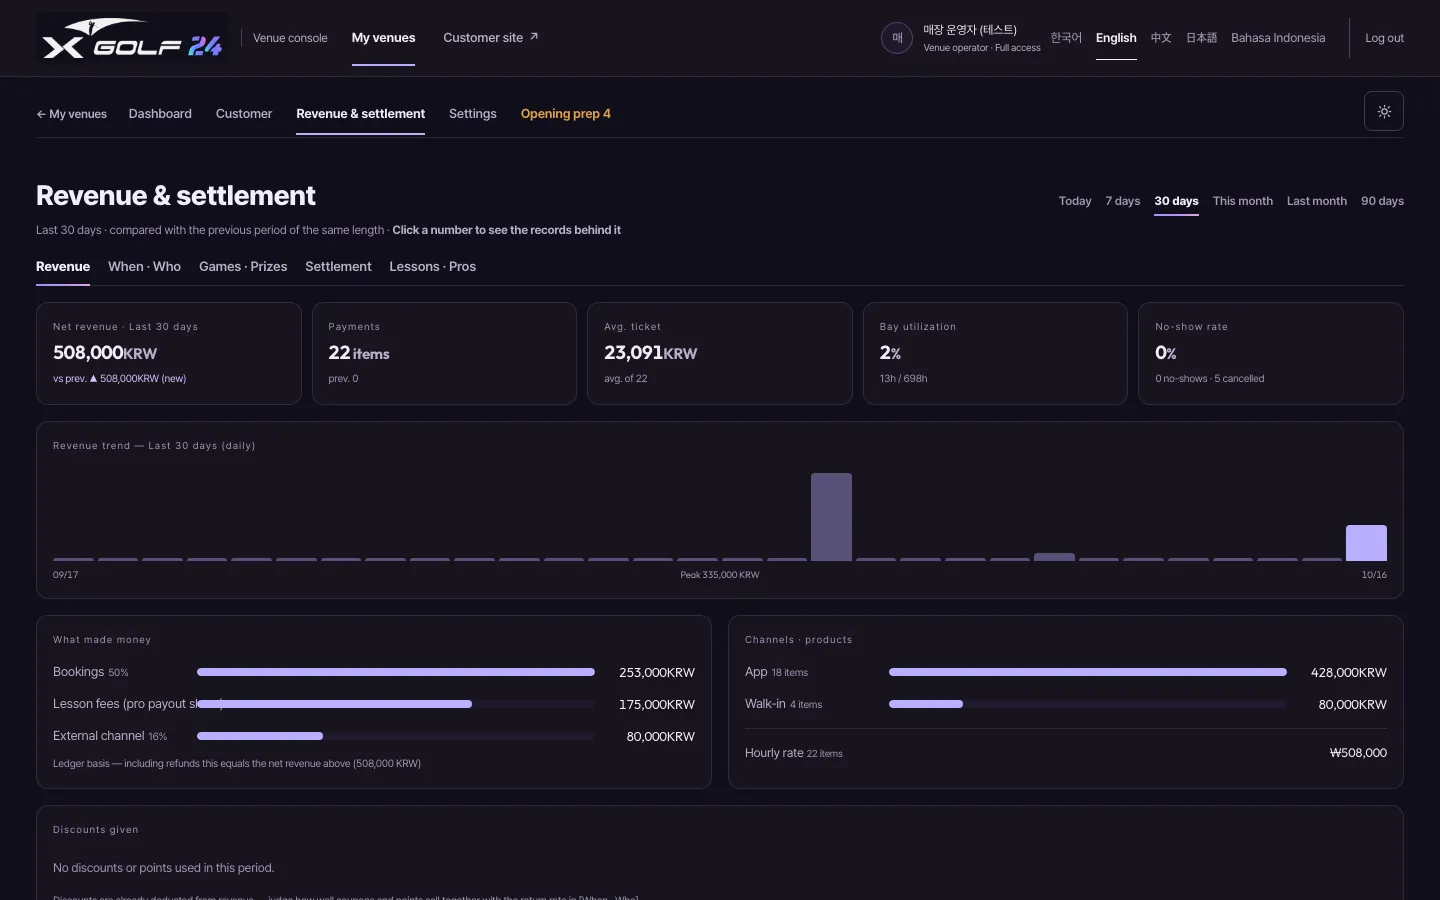
  1. Revenue & settlement: pick a period at the top right (today, 7 days, 30 days…) and all tabs follow. Click a number to see the items behind it; their total should equal the number.

/console/‹venue›/report
Revenue · settlement · daily close — 2
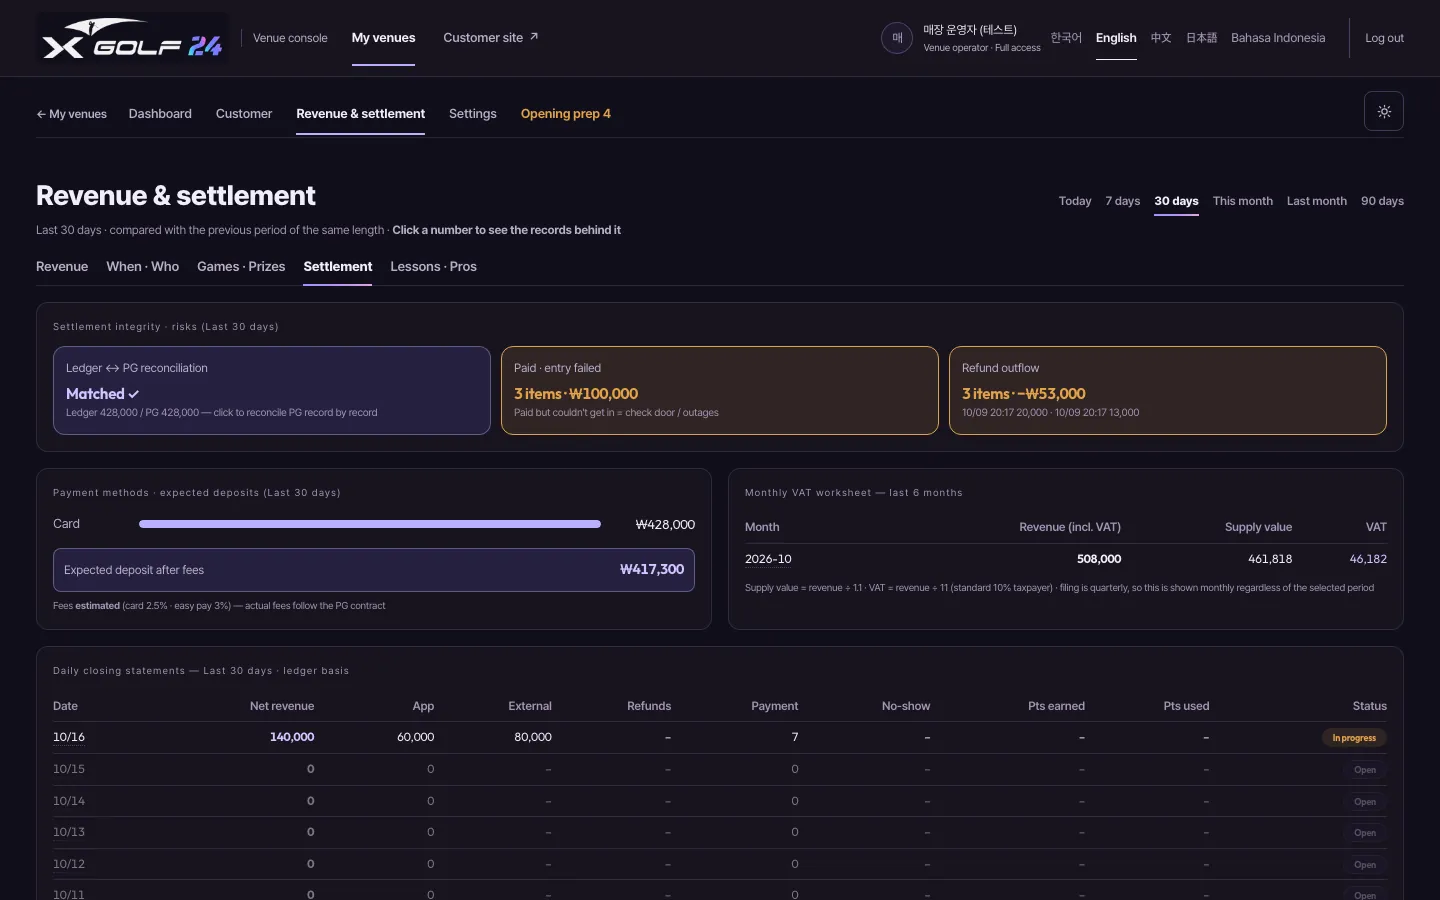
  1. Do the daily close in the Settlement tab. The three tiles at the top (ledger ↔ PG match, paid but couldn't enter, refunds) are fine when green; if yellow, click to check the items. Then check today's row in the daily table.

/console/‹venue›/report
Revenue · settlement · daily close — 3
  1. At the bottom, Download ledger CSV for this period gives a spreadsheet and Print settlement · PDF a one-page statement. Choose “Save as PDF” in the print dialog for a PDF.

2.9

Venue settings — hours · info

1 steps

/console/‹venue›
Venue settings — hours · info — 1
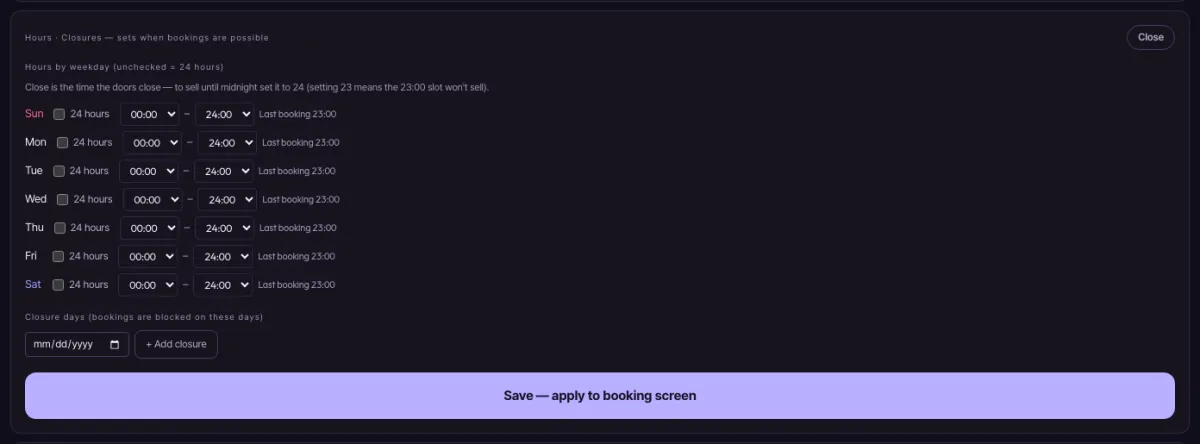
  1. Open Settings · Reviews · Device details at the bottom of the dashboard for hours and closures, venue info (address, parking, Wi-Fi, notice) and password change. Closing time is when the door closes — to sell until midnight, set 24. Edit, then Save — apply to booking screen.

CHAPTER 03

Opening · installation

HQ staff only need the checklist and a link; installers follow the phone work order top to bottom.

  1. 3.1Opening checklist (HQ staff)
  2. 3.2Register devices in their apps (outside our screens)
  3. 3.3Installer work order (installer's phone)
  4. 3.4Connect the venue PC — one command

3.1

Opening checklist (HQ staff)

2 steps

/console/‹venue›/checklist
Opening checklist (HQ staff) — 1
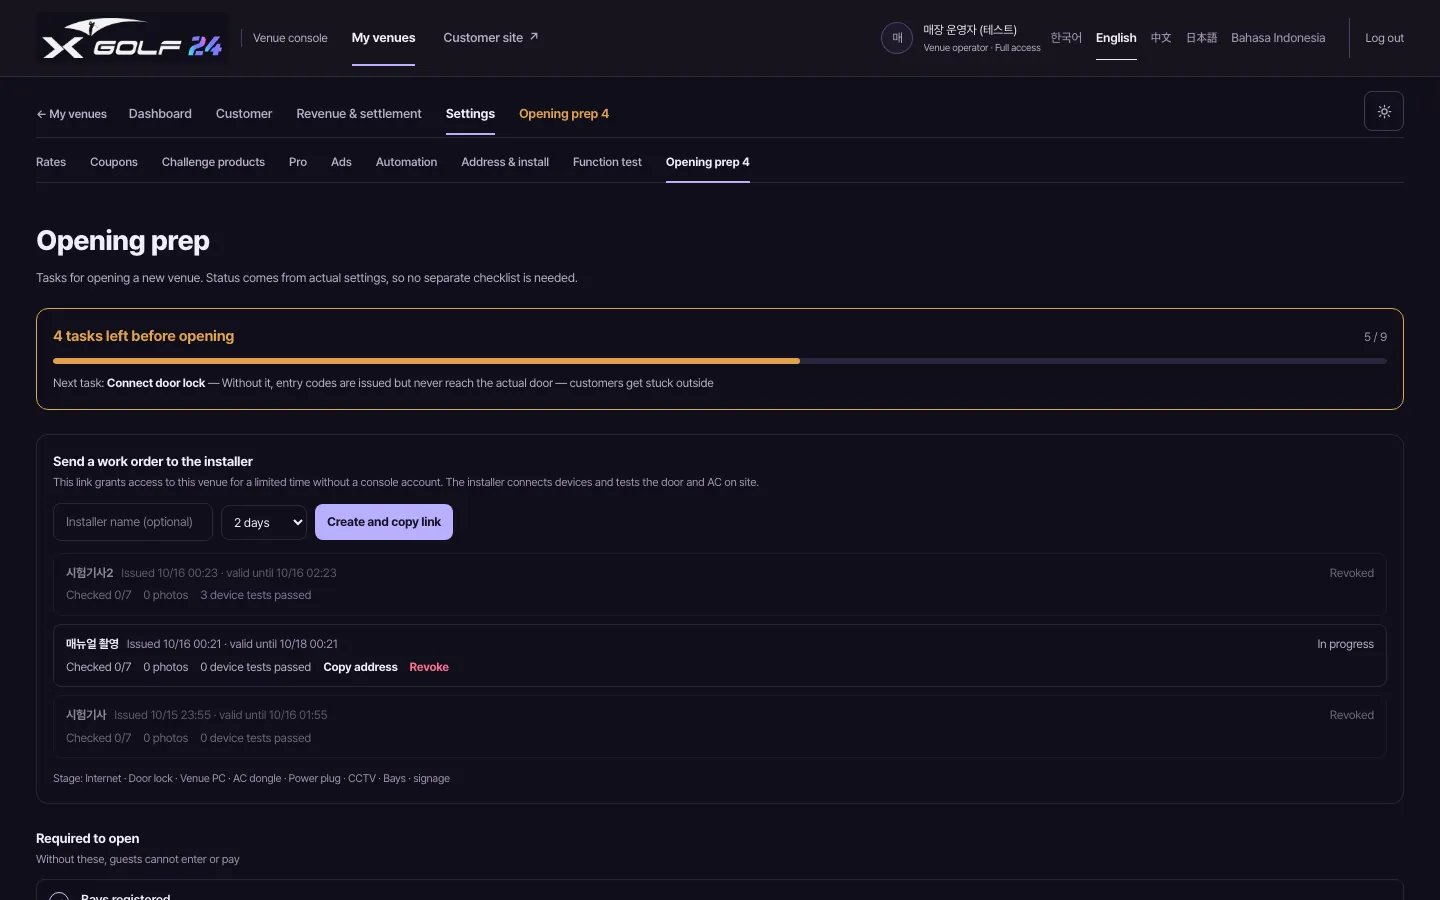
  1. Venue console → Settings → Opening prep. It reads the real settings, so there's nothing to write down. When every item under Required to open is checked, you can take guests. Yellow items have Go to task → to jump there.

/console/‹venue›/checklist
Opening checklist (HQ staff) — 2
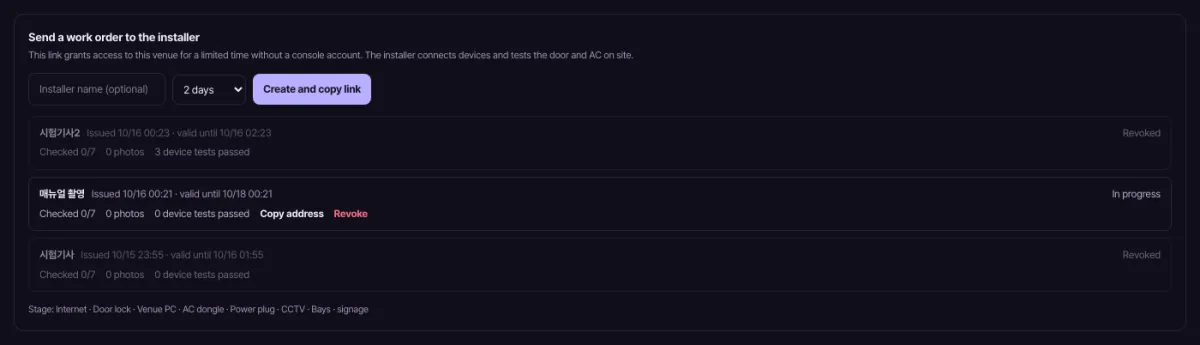
  1. Send a work order to the installer: choose the installer's name (optional) and duration, click Create and copy link, and text it. No console account is needed; the link opens only this venue for this period. Block it anytime with Revoke.

3.2

Register devices in their apps (outside our screens)

2 steps

Done outside our app — not our screen

  1. TTLock app — log in with the account HQ gave you → add the door lock → add the gateway. Plug the gateway in near the door and join it to the venue Wi-Fi. Only then does the lock appear in the work order's device list.

Done outside our app — not our screen

  1. SwitchBot app — add the hub, then add the air conditioner under the hub with ‘Smart Matching’ (point the remote at the hub to learn). Add the smart plug here too.

Installer work order (installer's phone) — 1
Korean-only screen
Installer work order (installer's phone) — 2
Korean-only screen
Installer work order (installer's phone) — 3
Korean-only screen
Installer work order (installer's phone) — 4
Korean-only screen
Installer work order (installer's phone) — 5
Korean-only screen
Installer work order (installer's phone) — 6
Korean-only screen
Installer work order (installer's phone) — 7
Korean-only screen
Installer work order (installer's phone) — 8
Korean-only screen
Installer work order (installer's phone) — 9
Korean-only screen
Installer work order (installer's phone) — 10
Korean-only screen

3.3

Installer work order (installer's phone)

10 steps

Installer work order (installer's phone) — 1
Korean-only screen
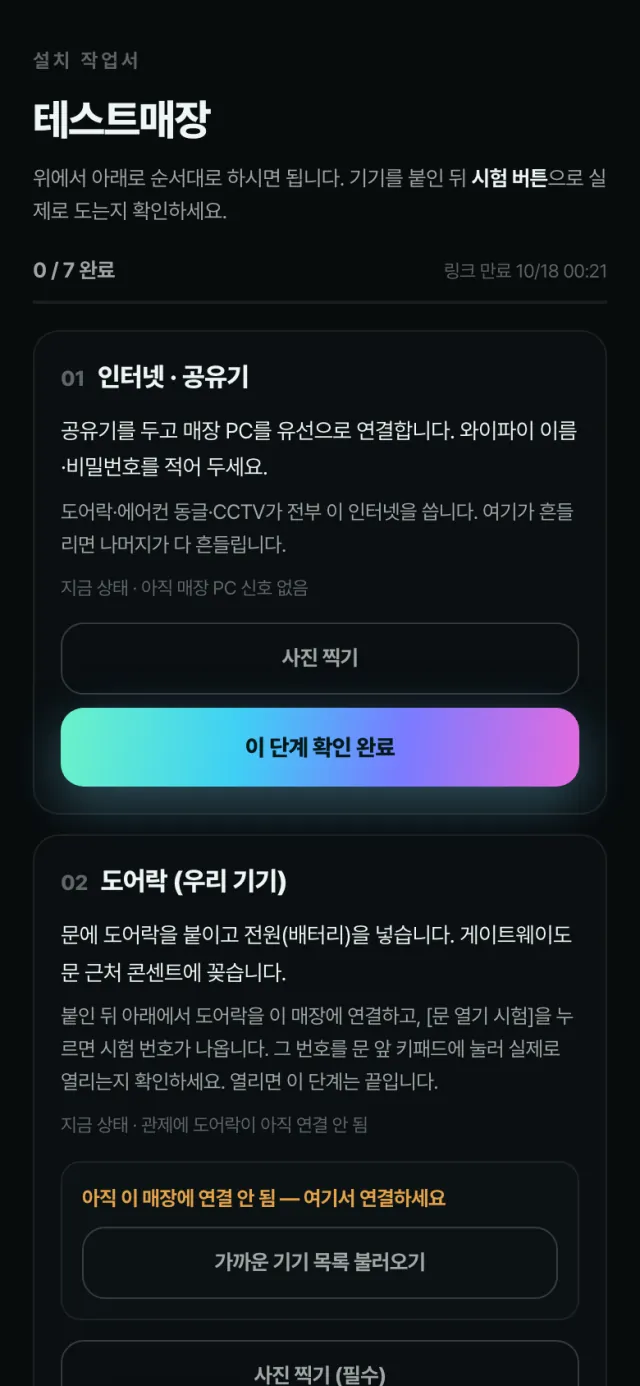
  1. Open the link from the text. Seven steps, top to bottom. Each one: attach → connect → confirm it really works with the test button. The bar at the top is your progress.

Installer work order (installer's phone) — 2
Korean-only screen
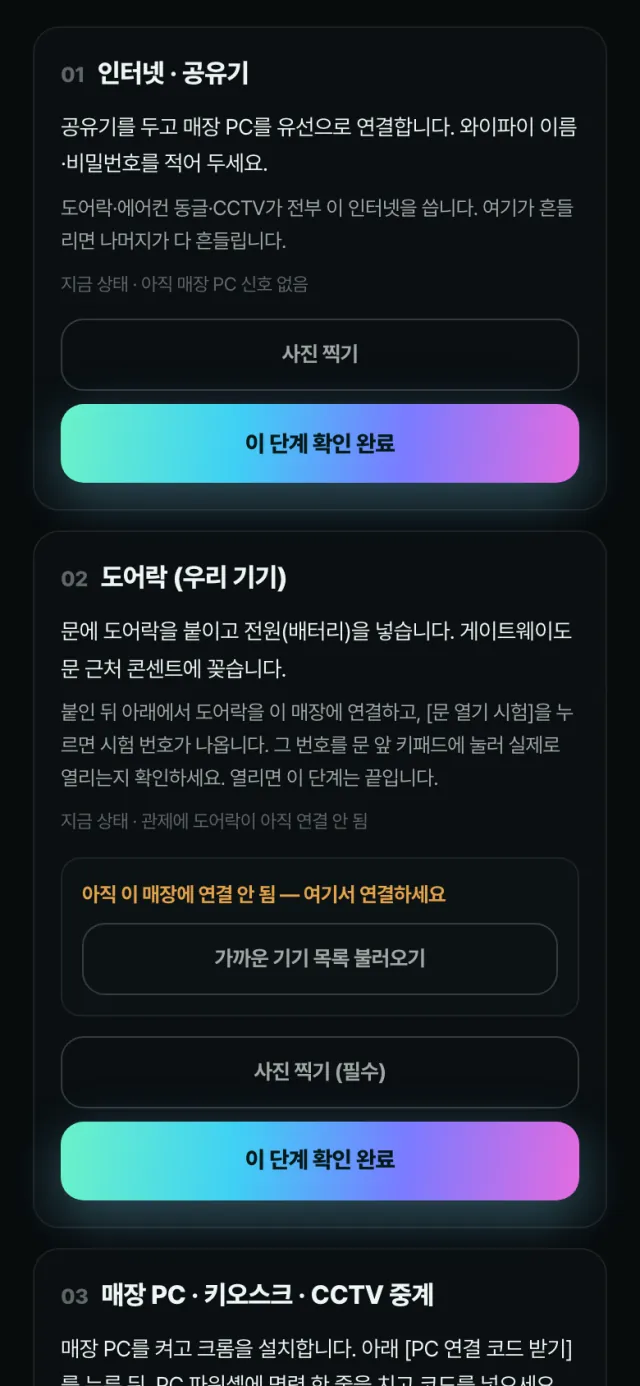
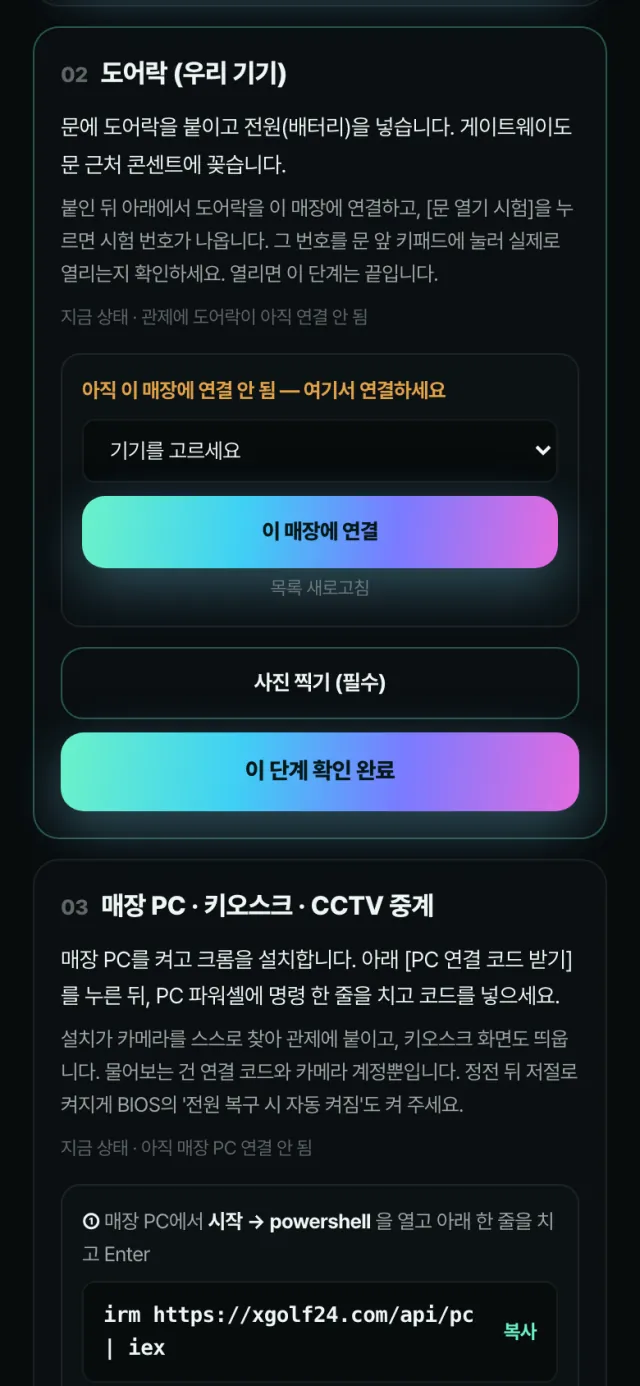
  1. 01 Internet & router: set up the router and wire the venue PC to it. Note the Wi-Fi name and password. Then tap Mark this step done(이 단계 확인 완료).

Installer work order (installer's phone) — 3
Korean-only screen
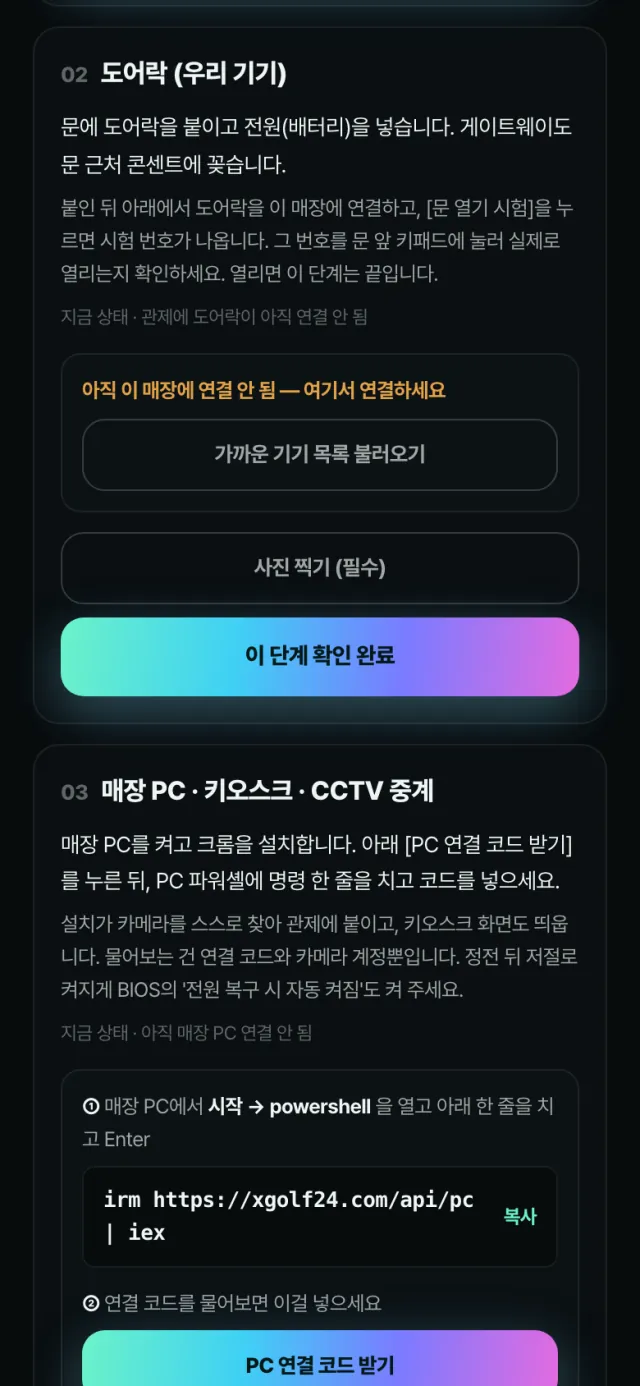
  1. 02 Door lock: mount it and insert batteries. If it isn't linked yet, tap Load nearby devices(가까운 기기 목록 불러오기).

Installer work order (installer's phone) — 4
Korean-only screen
  1. Pick this door's lock from the list and tap Link to this venue(이 매장에 연결). Then Door test — get a test code(문 열기 시험 — 시험 번호 받기) and type that code on the keypad; if the door opens, you're done (the code reaches the lock within a minute). Empty list? Check the TTLock app registration first.

Installer work order (installer's phone) — 5
Korean-only screen
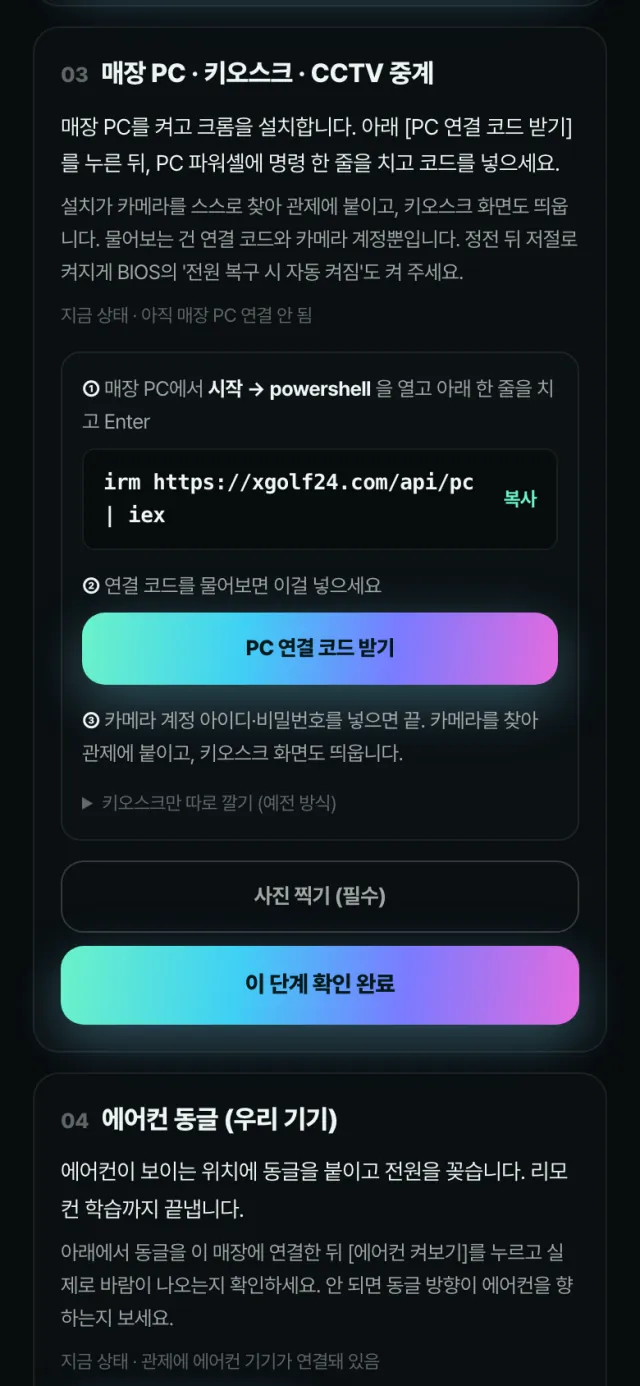
  1. 03 Venue PC · kiosk · CCTV relay: turn on the venue PC and install Chrome. The detailed order is in “Connect the venue PC” right below. Also enable ‘power on after power loss’ in the BIOS.

Installer work order (installer's phone) — 6
Korean-only screen
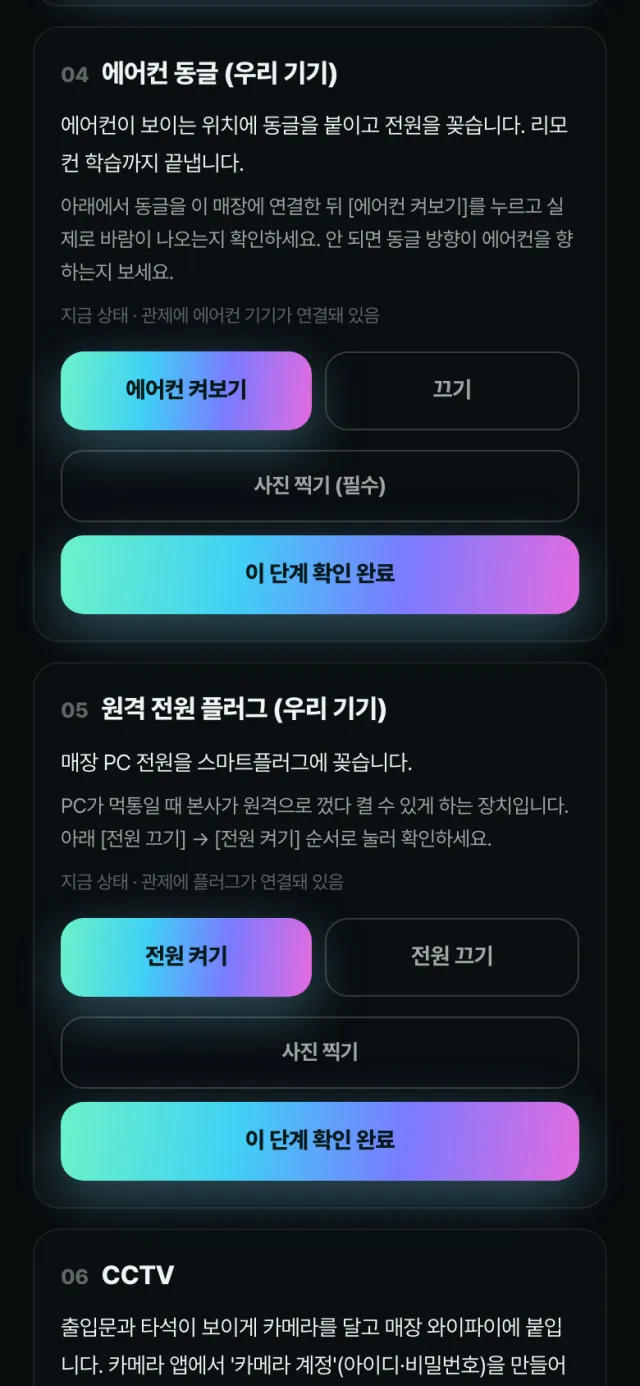
  1. 04 AC dongle: mount it facing the AC and finish remote learning, pick it from the list, Link to this venue(이 매장에 연결) → Try turning on the AC(에어컨 켜보기). If air comes out, done. If not, check the dongle faces the AC.

Installer work order (installer's phone) — 7
Korean-only screen
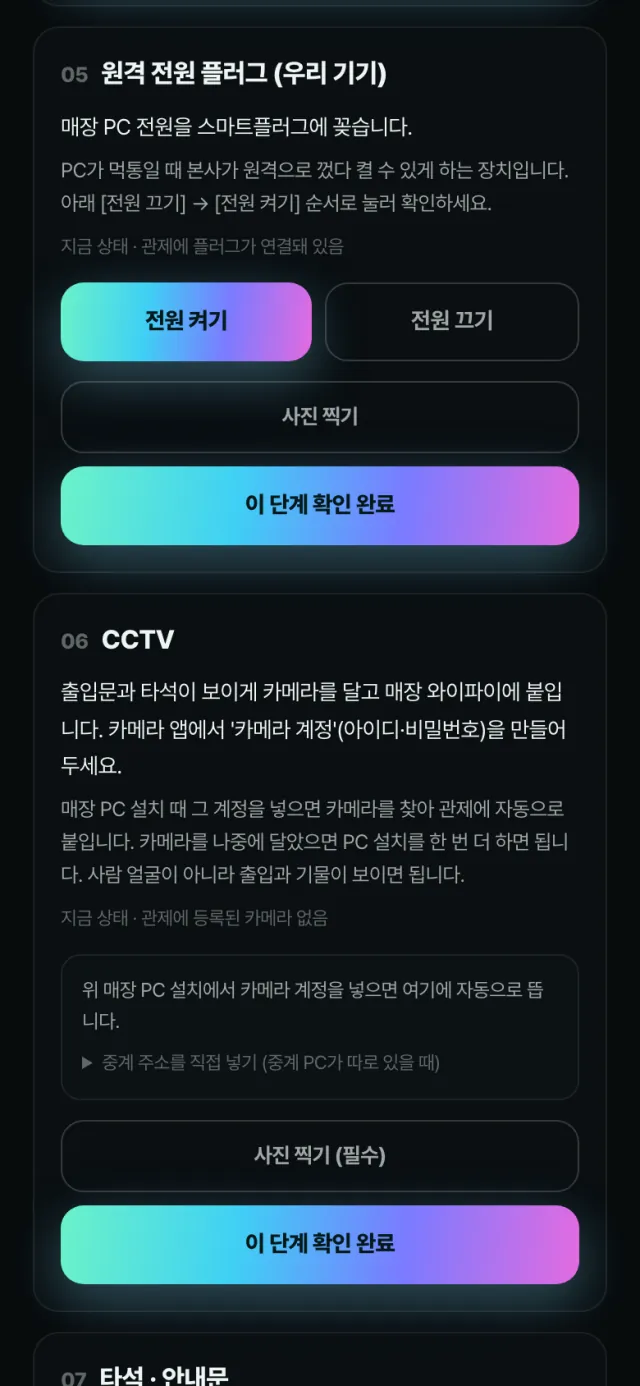
  1. 05 Remote power plug: plug the venue PC into the smart plug, link it, and test with Power on(전원 켜기) / Power off(전원 끄기). It lets HQ restart a frozen PC remotely.

Installer work order (installer's phone) — 8
Korean-only screen
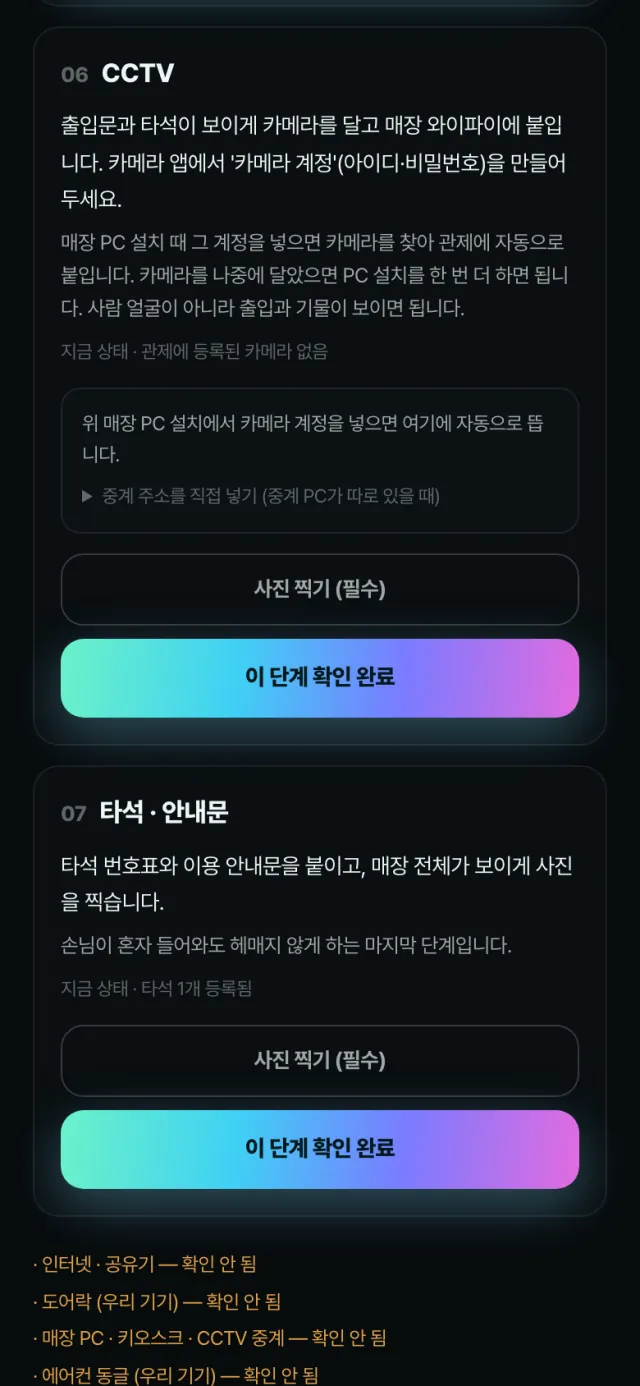
  1. 06 CCTV: mount cameras that see the door and the bay, and join them to the venue Wi-Fi. Create a ‘camera account’ in the camera app; when you connect the venue PC, that account attaches the cameras to the console automatically.

Installer work order (installer's phone) — 9
Korean-only screen
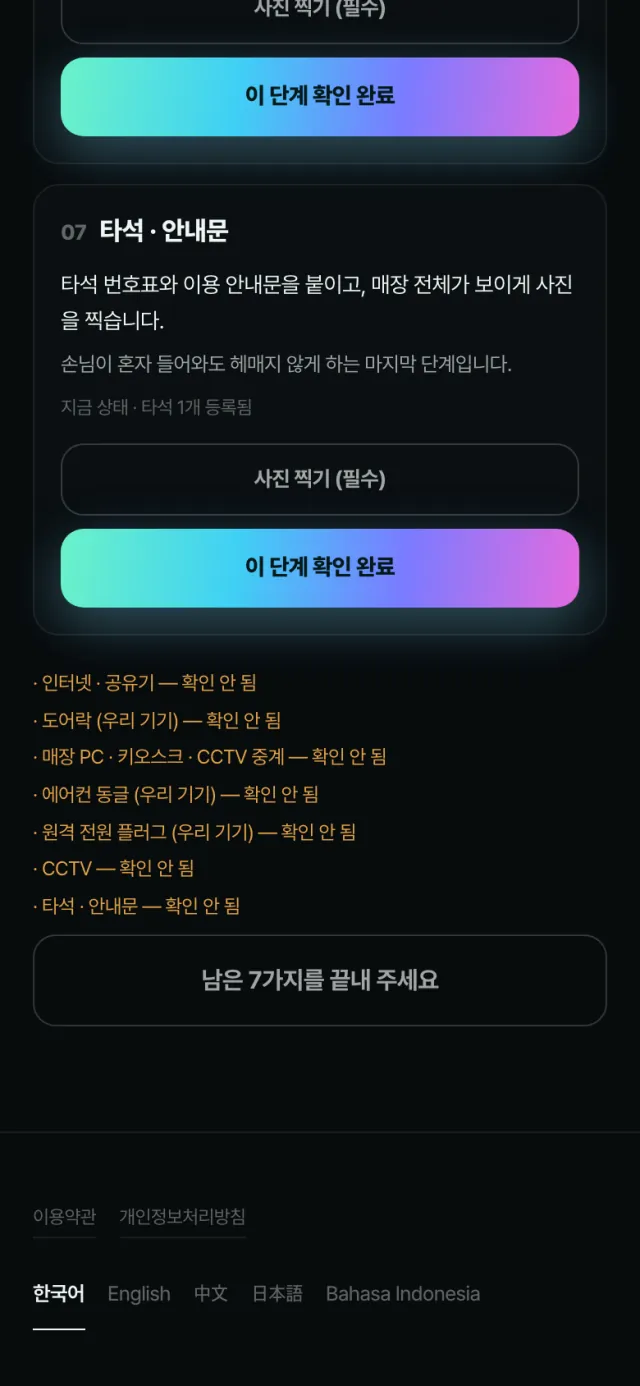
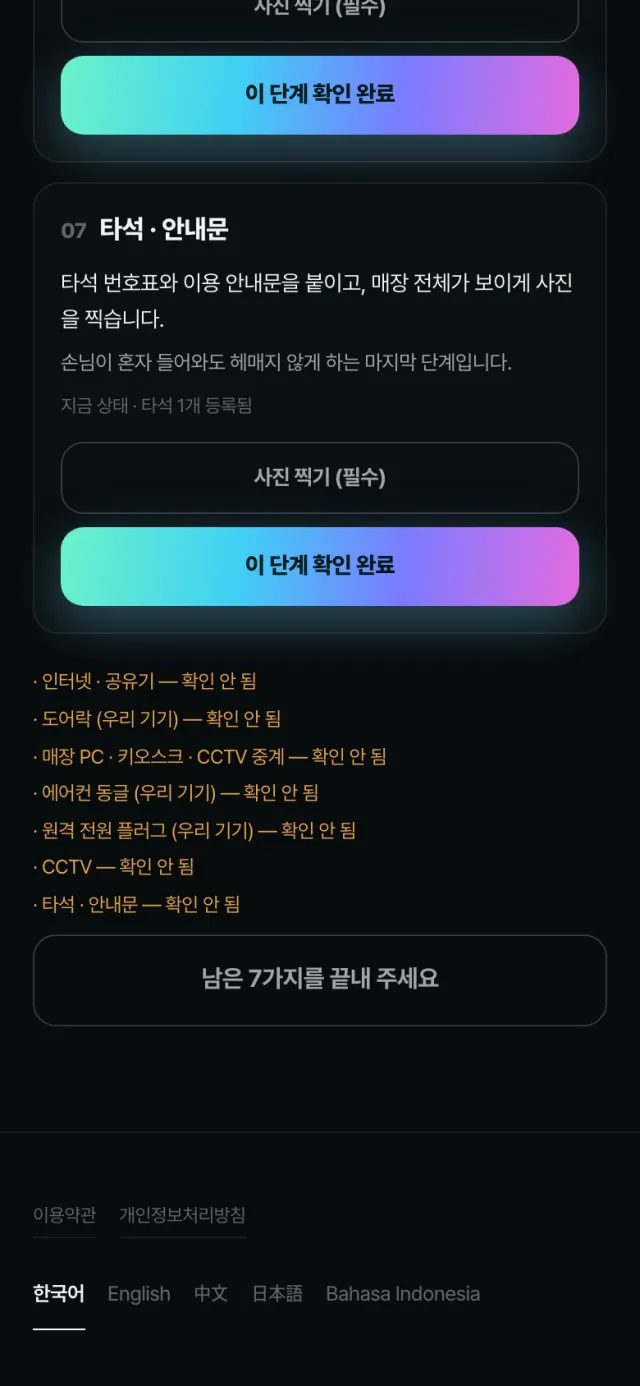
  1. 07 Bay & notices: put up the bay number and usage notice, and take a photo of the whole room. Every step keeps a photo via Take photo (required)(사진 찍기 (필수)).

Installer work order (installer's phone) — 10
Korean-only screen
  1. The bottom button tells you what's left. When everything is done, tap Submit installation(설치 완료 제출). Every link, test and registration by the installer is logged in the console events.

3.4

Connect the venue PC — one command

8 steps

/console/‹venue›/setup
Connect the venue PC — one command — 1
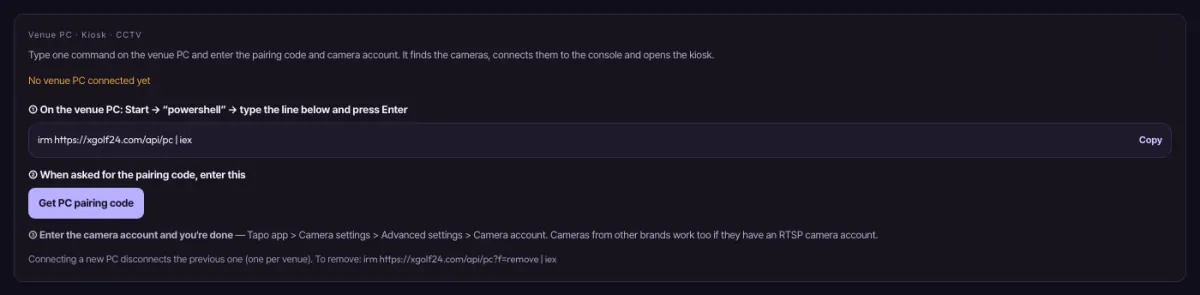
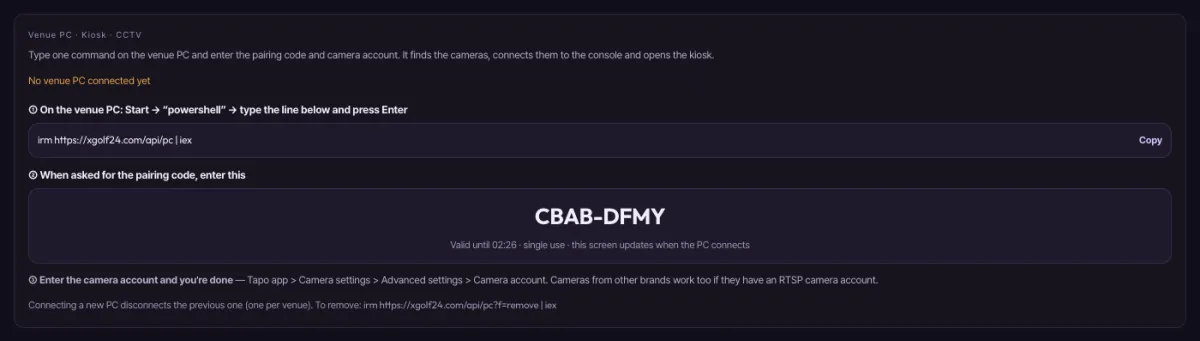
  1. Two places show this: the Venue PC · Kiosk · CCTV card in the console's Address & install, and the work order step ‘매장 PC · 키오스크 · CCTV 중계’. Both do the same thing.

Windows PowerShell
PS C:\> irm https://xgolf24.com/api/pc | iex==============================================  XGOLF24  매장 PC 설치 (Store PC setup)==============================================관리자 권한으로 다시 엽니다 — 뜨는 창에서 [예]를 눌러 주세요.Reopening as administrator — click [Yes] in the window that appears.

Windows PowerShell window — these are the exact lines the setup script prints. Text in ‹ › differs per venue.

  1. On the venue PC, Start → open powershell, type irm https://xgolf24.com/api/pc | iex and press Enter. If a new administrator window pops up, click [Yes].

/console/‹venue›/setup
Connect the venue PC — one command — 3
  1. In the console (or work order), click Get PC pairing code to get an 8-character code. It works once, until the time shown. When the PC connects, this screen updates by itself.

Windows PowerShell
[1/4] 관제 연결[1/4] Console link  관제 [주소·설치] 또는 설치 작업서 화면의 "PC 연결 코드" 8자리를 넣으세요.Enter the 8-character “PC pairing code” from the console or the work order.  연결 코드 (Pairing code, 예: ABCD-2345): ‹ABCD-2345›  OK  매장: ‹매장 이름›Venue: ‹venue name›

Windows PowerShell window — these are the exact lines the setup script prints. Text in ‹ › differs per venue.

  1. [1/4] Console link — type the pairing code and press Enter. When OK 매장: shows your venue name, it's linked correctly.

Windows PowerShell
[2/4] 카메라 연결[2/4] Cameras  카메라 앱에서 만든 "카메라 계정"을 넣으세요. (Tapo: 카메라 설정 > 고급 설정 > 카메라 계정)Enter the “camera account” made in the camera app (Tapo: Camera settings > Advanced > Camera account).  카메라가 없으면 그냥 Enter.No camera? Just press Enter.  카메라 계정 아이디 (Camera account ID): ‹아이디›  카메라 계정 비밀번호 (password): ‹••••••••›  같은 네트워크에서 카메라를 찾는 중… (10초 정도)Looking for cameras on the same network… (about 10 s)  OK  카메라 찾음: ‹192.168.0.23›Camera found: ‹IP›

Windows PowerShell window — these are the exact lines the setup script prints. Text in ‹ › differs per venue.

  1. [2/4] Cameras — enter the camera account ID and password from the camera app. The PC finds cameras on the same router by itself (about 10 seconds). No camera? Just press Enter.

Windows PowerShell
[3/4] 설치[3/4] Install  카메라 중계 프로그램 내려받는 중…Downloading the camera relay…  OK  중계 프로그램 준비됨Relay ready  OK  부팅 시 자동 실행 등록Registered to start on boot

Windows PowerShell window — these are the exact lines the setup script prints. Text in ‹ › differs per venue.

  1. [3/4] Install — it downloads the camera relay and registers it to start on boot. Just wait.

Windows PowerShell
[4/4] 이 PC 화면을 키오스크로 쓸까요? (Y/n): [4/4] Use this PC's screen as the kiosk? (Y/n)  OK  키오스크 자동 실행 등록 (나오기: Alt + F4)Kiosk auto-start registered (exit: Alt + F4)관제에 첫 보고를 기다리는 중… (최대 2분)Waiting for the first report to the console… (up to 2 min)

Windows PowerShell window — these are the exact lines the setup script prints. Text in ‹ › differs per venue.

  1. [4/4] It asks whether to use this PC's screen as the kiosk. Press Enter (yes) and the kiosk starts and opens on every boot. To leave the kiosk, press Alt + F4.

Windows PowerShell
==============================================  설치 끝 — ‹매장 이름›Setup done — ‹venue name›  관제에 이 PC가 '연결됨'으로 보입니다. 카메라 ‹1›대The console shows this PC as ‘Connected’. Cameras: ‹n›==============================================

Windows PowerShell window — these are the exact lines the setup script prints. Text in ‹ › differs per venue.

  1. When the green ‘설치 끝’ (setup done) appears, the console card shows this PC as Connected. If a yellow !! line appears, see “The venue PC won't connect” in chapter 4.

CHAPTER 04

Common snags · troubleshooting

Symptom → where to look in the console → what to do. Follow in order and most issues are solved alone.

  1. 4.1By symptom

4.1

By symptom

9 steps

Q1The door won't open

Guest: room key Try again → if not, type the DOOR CODE on the keypad → still not, Request help. Five wrong keypad tries lock it for 5 minutes.

Operator: check door records in Events → Reissue code in Booking details (live within a minute) → if urgent, Remote door unlock in Remote actions. If it keeps happening, check the door lock status on the Automation screen.

Where to look

/console/‹venue›
The door won't open — Where to look
Q2No camera picture

1) If Venue connections on the dashboard is offline, the venue PC is off → switch it off and on with Room power.

2) If the PC card in Address & install says No signal, check the PC's internet.

3) See if live view works in the camera app (if not, it's the camera).

4) Added a camera or changed its account? Run the setup command on the venue PC once more.

Where to look

/console/‹venue›
No camera picture — Where to look
Q3The AC won't turn on

1) In Automation, check Automation is on and that the AC switch is on.

2) Try AC control on the dashboard: On → Apply.

3) Still nothing? At the venue, check the dongle faces the AC and that remote learning (‘Smart Matching’) is done in the SwitchBot app.

Where to look

/console/‹venue›
The AC won't turn on — Where to look
Q4A guest paid but couldn't get in

An alert appears at the top of the dashboard, and the case shows in the ‘paid · entry failed’ tile under Revenue & settlement → Settlement. Click the tile to find the booking, contact the guest, then Reissue code or refund from Booking details.

Where to look

/console/‹venue›/report
A guest paid but couldn't get in — Where to look
Q5A guest says there's no extend button

The extend buttons appear only after the guest has entered (in use) and only when the next hour is free. If the next guest has booked, extension isn't possible — that's expected.

Where to look

A guest says there's no extend button — Where to look
Q6The 11 PM hour won't sell

Closing time means ‘when the door closes’. If it's 23, the 23:00 hour isn't sold. To sell until midnight, set 24. The screen also shows the last bookable time.

Where to look

/console/‹venue›
The 11 PM hour won't sell — Where to look
Q7The venue PC won't connect

The yellow !! line tells you why.

· Code error → a code works once, until the time shown. Get a new one with Get PC pairing code and run the command again.

· Camera not found → make sure the camera and PC are on the same router (Wi-Fi). If you know the IP, type it.

· Account mismatch → re-check the ‘camera account’ in the camera app.

· No report yet → check the internet and look at the console again in a few minutes.

Where to look

Windows PowerShell
  !!  연결하지 못했어요. 화면에서 새 코드를 받아 다시 실행해 주세요.Couldn't link. Get a new code on screen and run again.  !!  카메라를 못 찾았어요. 카메라가 이 PC와 같은 공유기(와이파이)에 붙어 있는지 보세요.No camera found. Check the camera is on the same router (Wi-Fi) as this PC.  !!  카메라 ‹n›대가 계정이 맞지 않다고 해요. 카메라 앱의 카메라 계정을 확인하세요.‹n› camera(s) rejected the account. Check the camera account in the camera app.  !!  설치는 했지만 아직 관제에 보고가 안 들어왔어요. 인터넷을 확인하고 몇 분 뒤 관제 화면을 보세요.Installed, but no report reached the console yet. Check the internet and look at the console in a few minutes.

Windows PowerShell window — these are the exact lines the setup script prints. Text in ‹ › differs per venue.

Q8The kiosk screen froze

In the console, Remote actions → Room power: switch the plug off and on. The venue PC restarts and the kiosk opens automatically — provided ‘power on after power loss’ was enabled in the BIOS and the PC was connected (kiosk auto-start) during setup.

Where to look

/console/‹venue›
The kiosk screen froze — Where to look